Pages

20080923

Ork Nob Tutorial, the deuce

Like most things painting related, Thomas beat me to the punch on his Ork Nob Tutorial. He has a great style, and he's ridiculously fast at painting up armies, that it is no wonder he finished his Nob before me. (I think this year I've painted three or four squads, while he probably finished three or armies in the same time.)


My style is a little more traditional and I usually don't do anything innovative. All my skills come from copying others' techniques. Sometimes things turn out same-old, same-old but sometimes I take little techniques from here and there and come up with something pretty cool looking. (I'm just as surprised as anyone when this happens.)


Before I started painting I took a good look at the Nob model. While the level of detail is good, and a huge improvement over the old Macragge push together models, there are a few differences between this Nob and the others in my collection.


First is a metal Nob (left) from the Nob Box set. There is a lot more fine detail on this model than two plastic Nobs, but the size and proportions are very similar to the White Dwarf Nob (middle). The Nob on the right is from the Ork Boyz Box set and suffers from universal Boyz legs. Since his legs come on the accessory sprue, these are the same legs for normal Ork Boyz, and look a little "weedy" in comparison. Otherwise, the detail is good, but is a little angular compared to the metal Nob. (I think the angularity is the result of the plastic or CAD design process, and not part of the style. While the stiches on the metal Nob have an irregular, organic look, the plastic Nob holes look exactly the same.)


The only complaint I have about the White Dwarf Nob is that some of the detail disappears when you rotation the model from front to back. For example, the WD Nob has a stikkbomb clipped to his belt with a round link. But when you turn the model to the side you can see it looks like a cylinder (instead of a round donut shape that a ring should be). From the front it looks great, but as you spin the model it almost looks like something that was made in 2D and converted into 3D. The handle of the stikkbomb has some "webbing" connecting it to the back of the Nob. Look at it from the side, and it looks normal, but turn it around to the back and it just doesn't look as expected. No doubt these artifacts are part of the model making process that makes these guys so cheap to produce. In the end, it really is nit picking, and from a few feet away you'd be hard pressed to notice the difference between the three different Nobz.


All differences aside, I wanted this Nob to match with my current Ork army. Using the same techniques as my Ork horde meant black primer, blank base and lots of dark metal that would match with my Goffs.


First come the base coats in this order: Orkhide Shade, Adeptus Battlegrey, Calthan Brown, Boltgun Metal, Chaos Black and Tin Bitz. After touching up errors, here's what you get:


My Boyz all have black pants and shirts (although I have a few Lootas with brown pants). For the Nob I wanted to try grey pants, to give him a little more detail over the normal troops. It will also help contrast against the black-metal chest and shoulder plates. I used the Chaos Black not just to touch up, but to paint over all of the black primer on areas that I wanted to remain black. I've found the Chaos Black has a little sheen to it, compared to a flat black primer, and this sheen makes for more convincing black metal. You could just use some gloss medium, but since I needed to touch up anyway, it wasn't that much more difficult to repaint all the black.


This step alone took about an hour and 15 minutes, but this is where most of the work is done. Plus at this stage you are painted to a 3-color standard, and sometimes when I am rushing to build a new unit or squad for a tournament, I'll just get to three colors and be good to go.


Next comes the first highlight layer: Knarloc Green, Astronomican Grey, Tausept Ochre and Mirthril Silver.


And now time for the wash: Thraka Green on the skin and Delvin Mud on everything else.


And after that, some final highlights and details to bring it together. Basing is just some Gale Force 9 earth and light brown static grass, to match the rest of my army.


This is the model I submitted to the Waaagh/Bolter and Chainsword painting contest. Zero votes, and rightfully so, there's nothing particularly special about it. Especially compared to the winning entry (although I could have done without the blue stripped pants on that one).


No conversions were allowed in the contest and I wanted to add a power klaw to my Nob, so I did some more work on it. I built the power klaw by scratch from plasticard and tube. I also touched up the metal armor plates, since they didn't turn out black enough for my taste. I also noticed his skin was a little lighter/highlighted compared to the rest of my boys, so I toned it down with another wash of Thraka Green to give it a deep, green glow. With the bosspole, now he's good enough to lead my Boyz into battle.


Total time was about 3 or 3.5 hours, including the PK (which is pretty easy to make), but I did notice I forgot to finish the skull on the bosspole!

20080902

DIY Photo Box On the Cheap

Hello, I'm Jim, but many of you might know me already by my forums name realgenius (from the movie) and I'm happy to be the latest member of The Painting Corps. While I do get out and play regularly, I love the hobby aspect of wargaming and spend way to much time scouring the Internet for new ideas and techniques.


Joining The Painting Corps was motivation for me to finally make a cheap photo box. After all, what good is a painting or modeling tutorial without good eye candy? And as an Eldar player, I am often confounded with photographing high contrast models. For example, I have a Biel-Tan army, and many of my Warlocks wear dark green robes and have white helmets or face plates. When I take pictures of these models I either end up with washed-out whites or dark greens so dark you lose the shading details. Hopefully a cheap and easy photo box will fix these problems.


There are several DIY photo box tutorials out there. The main purpose of a photo box is to provide a background and framework for lighting models. And my main purpose is to preserve my money for buying more models, so I decided to build my box with supplies I already had around the house.


Here is what you will need:
  • cardboard box, preferably a heavy-duty shipping box
  • tissue paper or sheer fabric, for light diffusion
  • tape, really any kind will work
  • one or more lamps or other lights
  • off-white, grey or light blue paper or fabric for the background

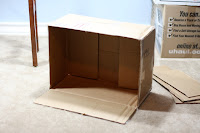
Make sure you choose a box that is large enough to hold whatever
large items you want to photograph, but not too large that it is going to take up a lot of space or put the light sources too far from small objects you want to photograph.


I found the perfect box out in the garage: 18 inches by 13 inches by
9 inches. I didn't want a box that was too deep, since I planned on having the background material spill out of the front to provide more depth if needed.


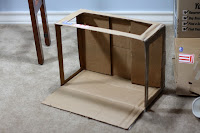
Next cut off three flaps of the top lid and carve out the sides and the top so a frame is remaining. Make sure to trim the sides close to the edge so that you can get maximum light into the box, but leave enough to give it some structure. I left about a 2" border.


Next, secure your diffusion paper or fabric to the frame with some tape and add your background material. I've used paper for background material before, but had some problems with weird reflections, so this time I tried some fabric (from a left over Halloween costume I made for my son). The fabric has good texture, but probably wouldn't be suitable if you are going to crop and add a different background in Photoshop. I'm far too lazy for that, so the fabric will work fine for me. The color will also help warm up the cool colored lights I'm using. If it doesn't work out, it is easy enough to replace with a different colored fabric or paper.


Here's a picture of the final setup, using my painting lamps as light sources. This project took me only about 30 minutes and cost nothing since I had all the materials around the house.


Finally I was able to capture the detail of both my dark colored models and light colored helms. Here is an example WIP Exarch that has heavy contrast, but photographed well. He doesn't have much highlighting now, but I can already see that both the dark highlights and contrast in the helmet will be nicely visible. There's nothing worse that working a long time on delicate shading and highlighting and not being able to capture the effect in a photo. (Not that this model has any delicate shading or highlighting, but...)


For even more options, you can vary the light sources to create different effects and mood. By using or not using the camera's flash, moving the lights behind the diffuser or not using the diffuser and altering the light source height you can create a lot of different lighting effects (top light, side light, hard light, soft light) that can change the appearance of the model.


Good luck and may all your pictures be sharp and well-lit!

20080901

Ork Nob Tutorial

Today I will show you how I finished the White Dwarf Nob in about 2 hours. The biggest help whenever painting any type of figure is to plan out your colors before hand. I pulled out all the colors and set them aside from beginning layer to highlight layer, followed by any washes I plan to do. This helps when you are trying to finish off squads and go for the conveyor belt painting. Or machine painting as I sometimes call it. But enough of that, onto the how to and the what the...

Step 1. Basecoat that sucka mc!!! I normally base my figures black. Why? I just like how they look with a darker shade. You can base them white, but I find it makes the metal too shiny. That works great for Fantasy or nice and happy figures, but for the armies I play (Chaos, Orks, Nids, Daemons) black is where it is at. Oh and onto the basing. I used a piece of wood you can find around any trees or plants at office buildings. It is just a cut piece that they use to help keep the soil around the plant. It works out great as a rock. Oh and yeah, I cut off the hair because I don't like hair on my orks for some reason. It just doesn't seem to fit well with me, and thus I wanted a different looking White Dwarf Nob.


Step 2. I've decided to start with the skin tones of the ork. My base color is a Catachan Green. I prefer to use this, because I am not a fan of the super green you normally see orks as. I think that green is just a bit too much, and much prefer the olive tones in Catachan Green as a base coat.


Step 3. From here, I use Knarkloc Green as the beginning of my highlight. I start to build it up in the shapes present on the figure. Luckily, the figure is pretty gnarly and for the most part you can do a sorta dry brush, but with a lot of paint on the brush style. You just take it and basically paint the higher points of the figure with the color. I try to leave the Catachan Green in the recesses, because, after we wash it, those will become much darker and create the shadow needed.


Step 4. Here I add the super highlight for the skin. I use a Camo Green, because again I like the olive tones these colors bring out, and I feel the color is more representative of what an Ork would look like. They are stinky and smelly, and thus not too bright and green. But hey, do whatever you want, this is just how I paint orks heh.


Step 5. I wash the skin in a Thraka Green from the new wash set. The wash darkens all the greens, and creates a harmony in the overall tone. It also creates more colors, due to the fact that the wash as a weight to it and it pulls down into the crevices.


Step 6. I add another highlight of Camo Green to the skin in order to pull up to a brighter highlight. And bamf, we are done with this orks skin.


Step 7. Lets start with the pants of this model. I decided to go with the tried and true brown pants for this ork. I went with brown because, a) it is orky, and b) it isn't too terrible difficult to create a nice leather effect. First layer of brown is Scorched Brown.


Step 8. After that, I start to highlight the pants using Calathan Brown.


Step 9. This is followed by Snakebite Leather.


Step 10. I use Bubonic Brown to finish off the final pants highlights. Just like the skin, I start to paint closer and closer to the highest point on the figure. This way it can create a much more starker highlight and shadow, and thus give you model more omph.


Step 11. Here I add the wash Devlan Mud, to help create a shadows in the pants and around the figure.


Step 12. Now I start with the metal bitz. I have my own method for creating rusted metal and I used the basics for this figure. I always start with a base of Tin Bitz. I use inks later on, and I find the brown and red tints in Tin Bitz to be great for bringing out a nice rusty color.


Step 13. Here I take Boltgun Metal to start to highlight bits of the metal. It is pretty bright, but once you put a wash over it, it brings it down just right.


Step 14. After that, I just use a Flesh Wash Ink to cover the metal bits. There is a lot of brown in this ink, and thus it really creates a nice rusted effect for the metal on the model.


Step 15. After all of that, I take a cheap Antique White, and dry brush over the metal. This helps break up some of the shine from the ink, and creates a nice look for the model I've found. It also gives it some weathering to the model.


Step 16. Now I add details to the figure. I decided to go with a nice counter color for the model. One of the best ways to make a model stick out, is to add a counter color. Something different that breaks up the overall form of the model. Here I decided to go with a nice yellow to help break up the monotony of the figure. I started with a base of Macharius Solar Orange on the shoulder pads of the model.


Step 17. Here is the finish model, after some more dry brushing of Antique white, and finishing touches of Iyanden Darksun on the orange bits to bring it up into the Yellows I wanted. I think the figure came out pretty good, and with the upcoming Nobz in the new starter set coming out, he might fit into a nice Nob squad that rides around in a Battle Wagon.

Another Introduction...

Hello, I'm Chris, also known as Aventine. I'm also stepping in to help with some articles here on Painting Corps. My objective here is to act as a bridge from the simpler techniques that Goatboy will show you and some of the advanced things Grey Death brings to the table. I'll be working on things like colour theory, intuitive highlighting, and intermediate basing techniques. I'll also be building a game board soon, I'm aiming for less than 100$ and less than a months time, so I'll certainly document that as well. I'll leave you with some samples of my work.