Pages

20100430

Friday Quick Tip: Tabletop Tank Tracks


Tank tracks are one of the easiest things you can weather on a vehicle.  The method breaks down to painting the metal, giving them a heavy wash, drybrushing metallic and a final dusting.

I can't just give that little info though now can I?  In this I'll run you through the basics of painting and at the same time weathering tank tracks to a great tabletop standard.  Again, it's all from my latest Sons of Medusa Razorback!  That APC has been a well of great tips!


I always start off with a black base color for my tracks.  Paint the tracks, the road wheels, sides and inside of your tracks, you really want to be thorough with this step, it's the cover up that will keep things from looking off should you miss a few spots with the later steps, in this case, I would have a bright green showing through on my track if I wasn't sure to hit all facets of the track links.  By the time your finished the first spot you painted should be about dry, unless you use really watered down paint that is.  Watered down paint helps when painting tracks, but you need to wait longer and do a few coats to get even opacity.


Boltgun Metal is applied loosely and heavily.  Slightly watered to give me a bit more speed of coverage in those hard to reach spots.  For nearly all of the painting you can use a larger brush that will hold a larger volume of paint.  It's as simple as 'Larger area, larger brush'.


To give that rusty look, I use a VERY heavy wash of Bestial Brown watered down to a milk consistency.  I slop it on the tracks and allow it to pool all around and in the cracks.  A second wash might be necessary if you watered your brown down too much.  See the above for the final result you're looking for with the wash. 


Once your wash is dry, which will take a while, break out your Boltgun Metal again and give your tracks a heavy drybrush to the raised surfaces.  This is to show the wear to the track by the vehicles operation.  The contact points will be worn away and bare metal showing through.


To finish the tracks off, I use a quick dusting of Bleached Bone.  To 'dust' with paint you simply need to set your brush and paint as if you were going to drybrush, but continue to wipe paint off the brush until almost nothing is coming off.  When painting, start with light pressure and work harder until you get a slight sheen of the color.

In the end you should have a nicely weathered looking tread with little effort.  The longest part of this method is the drying time wait.  I've used this method on a few different models in my Sons of Medusa army, each time it's enhanced the gritty hard fought look I've been going for.

You've seen how, now it's time for you to try it yourself!  Give it a go and see what you think.  Weathering can be a scary proposition for many, but you can't break that fear without trying it out!  I'm hard pressed to think of a better place to start your weathering journey than the treads of a tank! 

20100429

How To: Simple Wet Palette


I've run across several wet palette how-to's and I wanted to share what I've been using lately.  This version comes straight from Matheiu Fontaine's Adepticon class and it is cheap, simple and effective and works just as well in a hotel conference room in Chicago as it does in the dry air of my little room down here in Texas.

Here's what you need:
  • a plastic plate: not paper obviously, since that will soak up water and paint.  I haven't tried the foam plates, but they looked to porous.  You can get 20 for about $3 at Target or Walmart.
  • paper towels: three select-a-size paper towels was just about the right size for my plate
  • parchment paper: cut to fit just slightly smaller than the paper towels.  Find it in the baking section of your local store near the wax paper and aluminum foil.  One roll will last forever.
The construction is very simple: tear off some paper towels and fold them in half.  Thoroughly drench them with water.


You can see there's plenty of water.  The towels are fully saturated and there are even a new drops running around the plate.

Next: throw down your parchment paper.


Yup, it will curl up like that, because one side of the paper gets wet first and expands.  Either let it sit for a few minutes or flip it over to soak the other side.  You usually just need to spend a minute or two to get it flat and soaked into the water.  If your paper has a strong curl to it from being on a roll, use that to your advantage and place the sheet so that it curls down.  You'll still get curling, but it might be a little quicker to set.


Eventually you'll look like this.  Squeeze the air pockets out the sides of the parchment.  As you can see the parchment is just slightly smaller than the paper towel base.

I recommend, if you can, to always use the same size of paper towels.  The most involved part of this palette is cutting the parchment paper, so I cut out a bunch of rectangles sized to fit my folded paper towels.  When I fill up and get paint all over my parchment, I just grab a new sheet from the stack.

Don't worry about getting too much water in the plate.  You want the towels to be soaked, and a little extra water running around the plate can be handy.  I grab some of the "plate water" for a little extra thinning when I need it.  

I also use the exposed edges of the paper towel to wick away paint if I load up my brush too much, but keep a dry paper towel handy for drying your brush and keeping it from loading up too much thinned paint.

That's about it.  When the towel dries out, just add some more water.  If it gets a little funky from use, chuck it and get a new set of paper towels or even replace the plate.

Links!  We want em!  Send your links for great articles around the web to ThePaintingCorps@gmail.com!

20100428

Field Report: Declates Crusade Emperor's Champion


"Pardon me, I seem to have broken off my sword in your skull."  From Support By Fire comes a fantastic Emperor's Champion and presumably the skull of Gitzmott.  Check out all his Black Templars, and wash the taste of Blood Angels out of your hobby-mouth.

20100427

Field Report: Crater Making


I'm cranking back the time machine to dig up ideas for my Macragge board.  Ghidorah on Dakka shares a great crater tutorial that will be a perfect complement for all your wrecked vehicle markers.  In fact if you use a different shape for the base, you could make excellent vehicle-sized craters by throwing in a few extra bits.

Links, links, are good for the heart!  We want em!  Send your links for great articles around the web to ThePaintingCorps@gmail.com!

20100426

Ask The Corps: Polar Fortress


The BoLSCon Narrative Track has shifted and it looks like the Tyranid invasion of Macragge is going to replace Anphelion.  Of course I plan to build a Polar Fortress for the final battle!  While Dagobah was going to inspire my Anphelion, I am definitely not going to use Hoth for my Polar Fortress inspiration. Hoth was a temporary fortification cut into the ice while the fortresses on Macragge will have been in place for millennia.

Unfortunately, I haven't seen a lot of art on the Polar Fortress.  I like the look of the Forge World Imperial Fortress Walls (except for the Cinderella towers) and there is a great rock-fortress in the Black Templar's Codex.  We recently featured the Fortress of Eagles in a Field report, but there's not much else I've seen out there for large emplacements.

Got links?  Where are the big impressive Space Marine fortifications out there?

20100423

On The Table: Something Secret


I've been wanting to paint this guy since Adepticon, but Real Life (tm) got in the way.  Until now.

I'm not saying what he's going to be, but I hope I can give him "the best 40k paint job of all-time".

Any guesses?

Friday Quick Tip: Wrecked Vehicle Marker


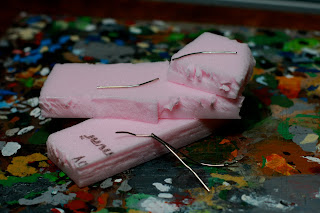
Today is a quick tip that I've been trying to post for quite a while.  Ever since I saw the huge explosion markers in the Apocalypse book I wanted to duplicate that look on a smaller scale for wrecked vehicle markers.  Here's a quick run-down on how I built the markers.


Foam, paperclips, hot glue and clump foliage are what you need for this project.  The foam and paperclips give you a foundation for the foliage.


I prefer to use the "Fall" mixture for this so that you can get a nice red-yellow-orange explosion color  without having to paint anything.


Build a shape with the foam and wire and lay out a bunch of the foliage on a paper plate or other clean surface.  You might have to break up some of the foliage into smaller bits, but keep a mix of size to give the piece more texture.


Work with the hot glue gun over an area of about a square inch or so at a time and them quickly press the foam into the pile of foliage on the plate.  Be patient and make sure you get good coverage and then gently brush the excess off after the hot glue solidifies.


Once assembled, painting is easy.  Either with grey spray paint or your airbrush, spray from above and slightly to the side to create smoke.  Then from the top spray some black for dark smoke.  If you want a more smoky look, spray the whole thing grey or black and highlight it with grey and white spray.  

Since the foliage is spongy, spray in light coats so that you can get it soggy.  If you get too soggy the paint will disperse through the foliage and ruin the top-down painting effect.

This project also scales well; you can do it on a small 25mm base or something as large as the Apocalypse explosions on a 5" or 6" base and several inches tall.

Links!  We want em!  Send your links for great articles around the web to ThePaintingCorps@gmail.com!

20100422

Field Report: Hobbit Hole


Today we have a field report from the world of "A Little Different".  Maddie Chambers has created a fantastic model of Bag End and has all sorts of wonderful techniques and details on her blog.

There are some great tips on in-construction page as well.  Some of the pieces are pre-made or recycled, but some (like the front windows) are hand made and spectacular with an incredible level of detail.

Why do I have a sudden urge to get some Fimo?  And then to eat it?

Links!  We want em!  Send your links for great articles around the web to ThePaintingCorps@gmail.com!

20100421

On The Table: Eldar on the Way

Eldar (Im)Patiently Waiting For Attention

A quick update segment I hope to make a regular occurrence here on TPC.  A quick snapshot of my painting table and its current denizens.  Happy Painting!

20100419

Field Report: Ork Trukk


This is an old one, but I love it.  I'm working on another Ork Trukk Project and GIS turned up this gem: a closed-cab Trukk for Ard Boyz by MadDokGrot at Vaults of Hera.  Too bad the site seems to have gone dormant, there are some great projects over there.

Links!  We want em!  Send your links for great articles around the web to ThePaintingCorps@gmail.com!

20100418

Field Report: Victorian Buildings


I make it a point to dig through the follower profiles from time to time on TPC and check out the occasional link.  Some days I'm really surprised by what I find.  Today is one of those days.  Maniple of The Lower Crypt has a great eye for terrain, and has really pushed the envelope with his latest project a set of Victorian era style buildings for Malifaux.  Check out his posts on them so far here, here and here.  You might be inspired to try your hand at a set of your own...like I am.

Links!  We want em!  Send your links for great articles around the web to ThePaintingCorps@gmail.com!

20100416

Friday Quick Tip: Painting Battle Damage


It's been a while since I've really dug in with weathering and this time around I've taken the time to get a good amount of photos along the way.  Many of you already know, I fully believe in the beauty of weathering, grit and damage on models and have been advocating their use for years now!  With this tutorial I'll walk you through my simple and effective method of paint chips/battle damage all done using just a few simple tools and a bit of good color choice!


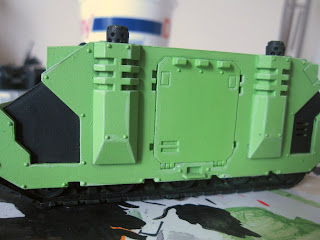
When starting off with my latest Sons of Medusa Razorback, I knew I wanted to approach it much the same as past things but try and speed it up a bit by adding depth in later stages.  So to start off, just getting your model to base color with a light highlight along armor lines and joins.  Get your colors blocked out, clean and smooth.  I highly suggest an airbrush to get your main color on and use a brush to block in the rest, in this case that's what I've done with the black.


Here you can see the tools of the trade.  I make consistent use of foam from a blister I bought way back when, chipping off a little bit of the crusted up foam each time and creating a new random edge to use.  In this same photo you see a big, gnarly messed up brush.  If you don't have one of these, you need one.  Go do a few terrain projects and trust me, you'll get one quick enough!  The brush is a bit less random but with a good eye for the pattern it's giving you, you can make it just as random as the foam but this comes with a handle!  When you're using the foam, you can do a few different things to help in the application, rolling it, scrunching it, whatever.  Just find something that works for you, is easy to work with, and gives the kind of pattern you're looking for.


I make use of a paper towel as my palette when working on chipping.  It's a bit easier for me to guarantee I won't blob the paint on and get just enough to the tips of the bristles or edges of the foam.


When you're using this technique/method, it's REALLY important to know what sort of pattern you're getting with what sort of pressure you're pressing with.  Check on a piece of paper, your palette, hand, whatever.  Don't just go blob the paint onto your model without first checking that you're getting the right look for what you're going for.  Make adjustments with paint amount, pressure, angle, and applicator before you go to the model with the paint.


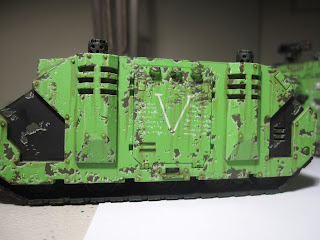
I've gone with Catachan Green as my vehicles 'primer/undercolor'.  This deeper green helps to push the color back behind the bright Scorpion Green base color.  Cooler/Darker colors will work great for this, but test a few things out on a few different test pieces.  See what works best for your color scheme and go through the full method for each to be sure of your color choices.  The level of weathering is up to you, a little, a lot, in between, whatever you like!  Pay special attention to high traffic areas like the hatches, edges and track sections.  Give your piece a bit of narrative with a few long scratches from some unknown alien race!  Have fun, and if you go a bit overboard, you can always paint the base color back in. 


Above you can see the Bleached Bone highlighting that is applied to the lower edge of all chips.  This is what really drives home the depth of the chipping.  I simply use the same color that I highlight everything else with.  Take your time with your chips to be sure you're hitting the right edges and the results will be nice and convincing.  Also don't be shy, those little chips need love too, get in there and go to town!


A lot of folks like to add freehand detailing to their vehicles.  After a few goes at it on various other projects, I've found that the best time to do so is after your chipping is finished.  You don't waste time with unnecessary details that end up getting smothered in chipping by an unsteady hand this way.  You know what sections you have to work with this way and save time by not having to paint some areas of your freehand details thanks to a convenient paint chip!  Just paint around the paint chips with your freehand and pay attention so you're not going over them.


Once the freehand is down, here is when you get to play a bit more and be free to make a bit of a mess.  Using my grime streaking, I go in with Gryphonne Sepia and from the edges, corners, bolts and a few of the larger paint chips, I streak down along the model a bit.  I don't like to go all the way down the model, just far enough to make it noticeable.  The above look took two layers of wash and a bit of heavy attention to the crevices with a big drop of wash painted in to add the depth we skipped out on earlier!   With regard to the top of the tank, I don't streak, but pool around areas like rivets and other details that stick out.  Just a quick pool around these details and a wipe off of the raised surface works wonders!

Once the wash is down, you can move on to a plethora of other techniques that all add something extra to the story of your freshly busted up ride!  I mentioned a few of these other details in this models Reinforcements article which you can check out here.

There you have it folks, at long last a fully realized chipping tutorial on a real model from very own Sons of Medusa.  I hope this opened a few eyes to how simple this really is, and maybe explained a few of the things many have issues with when they've tried the technique from the past article.  I'd love to hear some feedback and see peoples results from those who've given this a go!  

20100415

Field Report: Painting Realistic Rock


Misterjustin over at FTW has a fantastic quick tip for using oils to paint rock bases.  This is very similar to the technique that many use to weather tanks and other armor and it works great on rock bases.

Have a tutorial, painting guide or maybe just some quick tips of your own you'd like to share with a larger readership?  Send us a link at ThePaintingCorps@gmail.com and we'll help get your articles out to the community!

20100414

Field Report: Blood Angels Successor Chapter Lamenters


Aventine over at Zen 40,000 has been going to town now that his Lamenters army has been designated a Blood Angels successor chapter.  He's taken the opportunity to add a Sanguinor (buy) and Death Company (buy) to his already formidable force.

The wings on the Sanguinor have been given a special "vampire" touch: he mixed art store iridescent pigment with acrylic gloss medium to give an extra shine.


Here's an older images of his whole force.  I can't wait to see it with all the Blood Angels updates.


Have a tutorial, painting guide or maybe just some quick tips of your own you'd like to share with a larger readership?  Send us a link at ThePaintingCorps@gmail.com and we'll help get your articles out to the community!

20100413

Field Report: CSM Step by Step


All Things 40k has a nice little Step by Step Chaos Space Marine tutorial that is full of super simple techniques that end with a rather effective tabletop paint job.  If you're looking for a way to get some Chaos on the table quickly and looking good, check this tutorial out.

Have a tutorial, painting guide or maybe just some quick tips of your own you'd like to share with a larger readership?  Send us a link at ThePaintingCorps@gmail.com and we'll help get your articles out to the community!

20100412

Reinforcements: Sons of Medusa Razorback


It hasn't been too long since my last Sons of Medusa addition, but school and life found a way to get in the way of painting anything new for them, not to mention other projects that have come along as well.  Spring Break found me at just the right time with just enough freedom to allow some SoM love.

I've had this Razorback for some time now, it was the subject of my magnetic post a long time back, and sat around primed and sprayed green for the many months between then and now.  I dreaded working on vehicles thanks to my incessant need to have a smooth base color, and the time consuming number of layers it takes to do that by hand.  As fate would have it, I now find myself in possession of an airbrush, and the time saved when working with a color like Scorpion Green is worth its weight in gold!

The piece started in Tamiya PS-8 Bright Green.  As some might know, I found this color to be just off from the final hue I was hoping for, and end up painting much of the model over again with Scorpion Green leaving a bit of the later showing along with a wash of Thraka Green for some additional depth.  For vehicles, I've found that I can leave out a step or two from this formula, and get much the same finish.  I went straight to work with my airbrush mixing my Scorpion Green 50/50 or so with Windex.  I gave the entire model a few passes until the color was nice and even.  I can't tell you how much I love my new metal paint cup.  Since it's arrived I haven't used a siphon pot since.  If you have a siphon pot set up, look into getting a metal side mount paint cup, it's a small change that you won't turn back from when doing mini painting.

Once the base layer dried, I painted in the black sections by hand.  I then went to work adding a Bleached Bone highlight to panel lines, armor plates, joins, etc.  I went with a single pass for much of the detailing, I just wanted to accent them, not make them stand out against the base color. 

The highlights completed, I broke out my trusty gnarled brush and sponge for some battle damage and paint chipping effect.  For mine I use Catachan Green with a lower edge highlight of Bleached Bone, even on the black surfaces.  I don't go further than this with my chipping, though some will add additional shading to each section to give more of a dented/scratched out look.  This works great for smaller pieces/show models but for a table top model, the two step approach more than does the trick.

After the battle damage is highlighted, I went in with freehand detailing.  I like to have at the freehand at this point because I don't want take a lot of time on some freehand details only to have it completely covered by the chipping.  Placement is key here and try to not overdo it.  Sticking to the palette of your force will help these details fit in as well.  I use Skull White for all of the freehand details on my vehicles to help tie them back to the troops.  Multiple thinned layers with a steady hand will do wonders.  I don't go with the usual white formulas here as I want that nice flat look, it's meant to look painted or stenciled, I'm not trying to get a three dimensional look.

With the freehand in place, Gryphonne Sepia is applied in streaks and into crevices all around the vehicle.  I use a few paint chips as starting points here and there, while trying to stick to mostly rivets, armor joins and corners.  For the top, I only pool the wash around the details instead of dragging it in any direction.  Angled surfaces get the streaks though. 

Rivets are done after the streaks using a black base followed by Chainmail.  I don't bother to wash them down, they're too small for it to really matter and I like the way they stand out.

Headlights are done using Golden Yellow highlighted with Skull white to the center of the sections, as seen in my headlights tip from this very vehicle!

The black armor lines are highlighted with Codex Grey followed by a very light Fortress Grey final highlight. 

Smokestacks were painted Chainmail and washed down twice with Gryphonne Sepia.  The soot is done using my Tamiya Weathering Compact.

The tracks were painted Chainmail to start, washed heavily with Bestial Brown, dry brushed Chainmail and finally dusted with Bleached Bone.  Expect a tip with full photos in the future for this.

Gems and Lenses were painted in either red or blue using the following forumlas:  Red Gore, Blood Red, Fiery Orange, White or Shadow Grey, Space Wolves Grey, White.

Metals that were not already mentioned I went with a very simple Chainmail washed heavily with Badab Black.

With a full dusting of the entire piece of Bleached Bone, I sealed the model with Purity Seal and called it finished!  A good bit of feedback from my friend migsula will have me going back with Bleached Bone to add a bit more dusting to the skirts and rear of the vehicle.  I normally don't bother to go back on a vehicle to change things, but with the amount of time saved by the airbrush I wasn't burnt out on this one as I've been in the past.

I hope this look into my methods helps some of you and gives a new idea to consider for others.  Expect more tips from this project as I get the write ups done with a bit more depth to what I've explained here.  Until next project!

20100411

Field Report: Dakka Paint Compatibility Chart


Looking to vary your paint sets a bit?  Maybe you don't have access to that specific color mentioned in a tutorial you read recently?  Check this great little resource out over in the Dakka Dakka Articles.

Have a great link you want to share with the community?  Send it along to ThePaintingCorps@gmail.com!  We are always up for a new bit of info!

20100410

Ask the Corps: Treadhead planning


For some time now, I've been mulling an idea over and over as I waited out the release of more of the new GW Imperial Guard tank kits.  The newer details and plastic had me intrigued with the latest Leman Russ model, and I've always had a thing for the Guard.  With an endless number of variations on the theme, I've decided I would take my inspiration from the forces of the African front during WW2.  Hard fighting western style with a touch of 'local' custom.

I don't want to go with typical GW tread sets, but I've had little success finding suitable suspension and tracks/wheels to create the image in my head.  So today's Ask the Corps comes from me directly.

How would you go about creating the WW2 tracked vehicle look using GW kits?  Have you seen a project of late that has altered the vehicles in such a way?  Have photos?  Kits that would work?  I'm all ears folks.

Got a question of your own you'd like to see featured here?  Send it along to ThePaintingCorps@gmail.com with the subject 'Ask the Corps'! 

20100409

Friday Quick Tip: Headlights


I've always struggled with just what to do when it comes to painting Space Marine vehicle headlights.  From my earliest models, it was always an issue I just didn't have a good solution to.  When I started work on my Sons of Medusa force, I looked to a good friend of mine, migsula, as inspiration for my lighting solution.  I noticed something very simple about his method of lights for his TWAR project, solid and infused with a bit of inner light that made me think to simplify my approach to lights for my models. 


To get started I use a yellow base color.  Here I've gone with GW Golden Yellow, this just happened to be the only true yellow I had on hand when I started my Sons of Medusa, but you could really use any yellow for this as long as the shade works for your taste.  To be honest, you could use any brighter color at this stage, this process would likely work well for blue or green headlights as well.  You might just need to do a few quick tests to see what color works best for your model.


For the second stage of lighting, I've simply dabbed a small spot of white to the center of each section of the lamp.  Your highlight color may vary depending on the color you've gone with, and again, I suggest a bit of testing to see what works best.  But for something like lights, it's OK to think brighter and harsher highlight.


The light proper is finished, now to deal with the cage.  A quick hit of black along the cage lines will lay a good foundation for the metallic paint to come.  If you're using predominantly gold metals, you might think to use a brown at this stage instead to help give your gold a bit of a richer look.


Finishing off the headlight, I go with Boltgun Metal on my Sons of Medusa.  You should finish your cage metals however you've been doing them with your model and army thus far.  The uniformity in metals will keep the lights from sticking out too much, while still being a great point of interest.

I hope this little look into my method for the Sons helps those of you who've been looking for a quick and effective looking lighting solution!  I would love to hear about your approache to this mundane but important detail!

20100408

Adepticon 2010 Rogue Demon Open Category

photos by John Shaffer

Gold: Mathieu Fontaine


Silver: Bennett Blalock Doane


Bronze: Ian Villamagna

So there we go, that's pics of all the winner.  Are there any models you'd like to see more pictures of?