Showing posts with label Angels Sanguine. Show all posts
20110824
Reinforcements: Angels Sanguine
It's been about two weeks since I finished the latest additions to my Angels Sanguine force. I had been working so feverishly to complete the two squads of Assault Marines before a gaming weekend at a good friends house that I found myself burning out a little from the push. In the end, I did get them completed before heading out for that weekend and they saw themselves on the table fully painted and ready to rip his army and others to shreds.
20110802
Reinforcements: Angels Sanguine Assault Marine
To give myself an idea of how the basic troop for my Assault units will look, I took a marine from the unit I've been working on the last few weeks and painted him to complete. It didn't take much doing as the majority of the work was already complete. The main things I had to do were gems and detail work. Metallics were given a touch up and black areas given highlighting.
The marine follows the majority of the color scheme laid out by the Angels Sanguine Terminators. But with additions of the yellow which was done through GW Iyaden Darksun followed by a highlight of 50/50 Iyadend Darksun/Ivory and a final Ivory highlight.
The shoulders were also done to help lay out colors and ideas for the army. I've gone with Second Company markings for this force, so yellow teardrops on the right shoulder. The left shoulders will have chapter badges, but because of how odd the placement is for this guy, it was hard to get right, plus, I wasn't really happy with just how it came out, so I will have to continue to work on the approach for the badges in the future.
The base used rust colored pigments mixed with VMC Matt Varnish to create a crusted and rusted look. I drybrushed this with GW Boltgun Metal along the edges of the plates. Mixing in more pigment brings out the matt/powdery look of the pigment while adhering it nicely to the surfaces.
20110729
Reinforcements: The Sanguinor
Early mornings these last two weeks have found me getting more accomplished. Completing new Space Wolves in the form of Wolf Scouts last week and a Rune Priest this week was a good break from the black and red of my Angels Sanguine. This time around, I've found time to finish my Sanguinor that I was lucky enough to win through a random giveaway by Santa Cruz Warhammer a while back. It's good to finally get this model finished after having him shelved for so long and I hope the paint does the model, and their generosity, justice in the end.
20110725
On The Table: Sanguinor and Friends
I've decided that fighting my hobby ADD by forcing myself to focus on a single model, or project no longer suits me. The butterfly that is my wargaming side is never completely settled on any one army and I always long to just do a little work here and there on everything else, be it modeling or painting or a random terrain project. There are so many great models in my collection that I just can't help but let whatever ends up catching my eye in the hobby room make it to the table for at least a little work.
20110711
On The Table: Angels Sanguine
As I mentioned in last weeks tip on painting yellow, I've gotten a good amount of work done on my Angels Sanguine Assault Squads over the past week. The last time I posted about them, they were just bases, now they've begun to come into their own with their armored bits all finished, and details started. But as everyone knows, this is when things start to get bogged down in batch painting. Progress will be much slower to come by and that sense of accomplishment after finishing one models stage is quickly diminished when you look up and see another 7 or 8 models staring back at you.
20110704
On The Table: Bases Sanguine
I've been mulling over the idea of getting my Angels Sanguine built up into a proper army at long last and have been slowly collecting bits as well as putting the models I plan to use for them to the side. I've accumulated a good amount of models so far and am planning one last purchase or two that would get them off and running, not to mention fieldable!
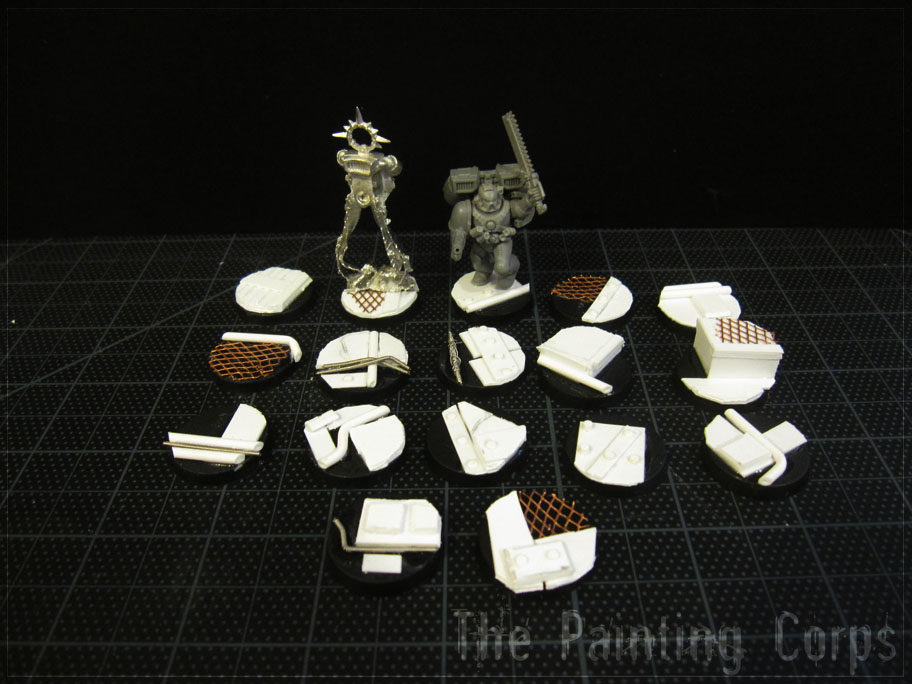
For now though, I've taken some time today to crank out a fair amount of bases to save some time down the road. They're a take off of the work I've already done with my Angels Sanguine Terminator Squad that I made use of the Space Hulk terminators for. The basing scheme worked well and quickly for them, and works even faster for regular models. In the end it's a Ork Hulk/Krooza feel and that's something I'm more than happy with! I've even taken it a few steps further this time creating elevated platforms on two that were built up making small box shapes out of plasticard. All around it's a variety of plasticard thicknesses, tubing, guitar wire and Contour Mesh
I'm not certain when this army will see full out build and paint sessions yet, but this was actually a nice breather and allowed me to just play around with ideas while sticking to the theme. It also let me knock out what could have been a speed bump from unit to unit in a part of a morning! Getting 17 bases done, including one that fits the slot for my Sanguinor ( Thanks Santa Cruz Warhammer! ).
A single Death Company box should get this army going nicely, and with the bits I've already picked up from the box from Battleroad Games' Ebay shop, I'll have enough cool stuff to help deck out my Assault Squads as well!
With so many bases it's going to be hard not to start modeling the assault squads right away! Anyone seen any cool basing ideas around the web lately?
Labels:
40k,
Angels Sanguine,
Basing,
On The Table,
Space Marines
20100601
Reinforcements: Angels Sanguine Terminator Squad
After some marathon painting sessions, the last of which I pulled an all nighter, the first squad of terminators are finished for my Angels Sanguine. I painted the four new models all at once to save a little time along the way, and while I'm sure I did, it started to bog me down some when it came to the details. Early on the batch painting was showing it's bonus. The base colors went down quickly and efficiently, even highlights weren't an issue, but when I got to working on the metallic sections things slowed down considerably. But in the end, I've got four models to complete out the squad!
The basing was developed more with these models and additional bits and extras were added to the mix in the form of plastic tubing and metal mesh. All of the models are magnetized for double duty on the 40k battlefield and in the confines of a Space Hulk. I believe the look I was after was successfully captured with them.
The genestealer spine was a big bonus in painting the above model. It gave me a chance to lay out an idea for my genestealer color scheme without committing to an entire model. I didn't want to just go normal 'stealer colors for them, and wanted to give a truly alien feel while keeping them grounded in a realistic palette. I went with a VMC Brown Violet base highlighted a few times by mixing successive amounts of VMC Ivory in to a very thin highlight of pure Ivory. I went back in with Thraka Green and washed everything and when dry, I hit the fleshy bits with Devlin Mud. For the gory bits I mixed Devlin Mud with some VMC Flat Red and washed it on.
Each terminator followed much the same 'recipe' of the first terminator I finished. It was actually a bit hard to get the colors to match just right, mostly because of the difference in the base zenith white/black base coat. A bit too much white lead to my models being a bit brighter than I had intended. A few additional washes helped to tone the models back down, but left them extremely shiny. I had to use painted on matt varnish, watered down of course, to kill the shine. I hope to work out that issue with the next set of Angels I work on.
The face on the sergeant was a point of concern when I started this project. I wasn't up for doing a head change to 'fit the fluff' but figured I could give the model a disturbing look to attribute the fluff to. I went at the face by first painting VMC Ivory and then washed it with a violet I mixed up from VMC Medium Blue and VMC Flat Red and watered down. I started picking out the details in thin layers of Ivory and eventually washed it very lightly to punch up the contrast with Devlin Mud. The eye was painted in with a pale blue to give it a cold almost dead look with no pupil to help reinforce the idea. I'm really really happy with how it all turned out and capped the head off with by painting the hair with VMC German Grey and picking out the details, along with creating some, with pure Ivory.
I can't wait to start on another squad for these guys, the color scheme is just so striking when finished and was actually a lot of fun to paint. I've got a Sanguinor on the way from Santa Cruz Warhammer that I'm looking forward to painting up for the force as well as some Assault Marines I've had since BoLSCon waiting for an appropriate project to come along, not to mention the rest of the Space Hulk Terminators to finish off! For the moment I'll be taking a breather and finishing up another piece that I've been holding off on for a while now.
If you've got a question feel free to leave it here in the comments section! C&C is as always very welcome!
20100525
On the Table: Space Hulk Angels Sanguine
I always knew these models were cool, but damn they look good when based and placed together. This is the first set of 5 for my Space Hulk set that will see double duty as Angels Sanguine for 40k. The bases are magnetized for easy and quick removal for either mission. Expect a tip on how I went about this come Friday! If you didn't see the latest articles from this project, be sure to check out the Reinforcements here.
20100524
Reinforcements: Angels Sanguine Terminator
When I originally ordered my Space Hulk set, I had no idea when or how I'd go about getting the models painted. After receiving the box though, I quickly thought of one of my favorite color schemes, The Angels Sanguine. My decision was made. Now, where to find some time...Classes have kept me quite busy, and I'd been using what little free time I did have on a few other projects. Since classes are now officially finished for the semester though, I've been able to finish my first Angel of Death.
I used zenith styled highlights, both with my airbrush and bristles. The breakdown of this can be found here for those interested.
The black was painted without using a true black base color. Instead I went with VMC German Grey as the base, highlighted with Codex Grey by glazing the color on subtly according to the facing, the higher and more in line with the 'light source' the more highlighting was applied. This was then washed down and shaded using Badab Black.
Once base colors were finished, metals were applied with Chainmail and washed with Gryphonne Sepia or Badab Black according to what finish I wanted. See this set of articles for a bit more on how I go about metals.
After the metals, it was time for the gems. I used VMC Purple VMC Black and VMC White to create a spectrum of color on my wet palette (Buy: Masterson Sta-Wet Palette Seal
The purity seals parchment was painted with VMC Ivory to a solid finish. The text was done using Bestial Brown and then the entire thing was then washed down with Gryphonne Sepia. The wax was painted with VMC Flat Red and highlighted with a light mix of Flat Red and White, this was glazed slightly to tone the highlight back down with Flat Red.
The base was added by chopping up a bunch of plasticard and lining an outline of the models attached base on a 40mm round base, then trimming the excess. The model is secured by putting a magnet in the base of he model and gluing one to the underside of the round base. Expect an article in the near future on this one!
The base was painted Boltgun Metal, then using pigments from AwesomePaintjob.com, I added the rusting. I mixed the pigments with VMC Matt Medium and applied it heavily all over. I started with the deep brown pigment and then when dry I applied the orange rust color in the same way by stippling it on heavily. Then going back in with a drybrush of Boltgun Metal, I hit the edges of the sections and gave them a worn away look. To finish the base, I painted the rim Black.
I'm really looking forward to getting more of these guys finished. I can't wait to have a fully painted set for Space Hulk, but it's quite a ways off! I've already modeled the next of the set and hope to get started soon! I might even find the time to take a few extra photos of the a few more steps along the way! Stay tuned!
Subscribe to:
Posts (Atom)