Showing posts with label Photography. Show all posts

20100220

Field Report: Photography Thoughts


Awakening Ynnead has some great thoughts on photographing your minis. And who couldn't use a little bit more knowledge on that front? Check it out here.

Got a great link you'd like to see put up? An article you've posted on your own blog? Send it to us at ThePaintingCorps@gmail.com. Just be sure it has something a bit more useful than a pretty picture! It's all about learning folks!

20100209

Field Report: Diffuse Lighting


Massive Voodoo have posted a fantastic idea on how to get better lighting for your models using a bucket from Ikea. Head over and check it out, I know I'll be looking for one of these next trip out there...

Got a great link you'd like to see put up? Send it to us at ThePaintingCorps@gmail.com. Just be sure it has something a bit more useful than a pretty picture! It's all about learning folks!

20081212

Friday Quick Tip: Setting your white balance

I've got a "photo Friday" tip for you this week to help your pictures come out true to the original: set your white balance.

Setting the white balance is just a tool for getting your pictures to look like you want them to look. There really is no right or wrong, except for what looks good to you. Almost all digital cameras have some setting for white balance and in most cases the "auto" (AWB) mode will do a decent job.

But when you take a picture under less than ideal lighting conditions, the color usually will not be true to life with AWB.

Here's a demonstration that shows how the white balance setting changes the color of a picture.

This picture was taken with 5500K fluorescent lights and a light tan fabric background. The modes in the first column: AWB, Daylight, Shade, Cloudy, Tungsten. The second column modes: Fluorescent, Flash, Custom, Kelvin.

The AWB mode does a decent job, but the most faithful reproduction of color is the Kelvin mode, since I have it set to match the 5500K output of my lights. If you can control the light, setting your camera to the light color will usually give you the best results.

But often you aren't controlling the light. For example, if you are taking a picture of a model outside in the shade, you might find that your model looks too "blue". In this case you can use the key above to pick one of the mode "yellow" modes: Shade, Flash, Cloudy.

If you are inside taking a picture of a model on your desk with only a single lamp, your model may look too "yellow". In this case try Tungsten or Fluorescent modes.

If you want to get advanced, you can use the Custom mode on your camera. For the image above I set the Custom white balance based on the tan fabric with no model. As you can see the tan hue of the fabric was removed (turned almost grey) and the model is given a darker almost bluish cast. By setting the custom WB to an image with a strong color, you can get some interesting effects in your photos; like "fake night" explained in this white balance article. You can find some good tips on setting and trouble-shooting your white balance in this article.

What photography tips do you have for getting great photos of your models?

20080902

DIY Photo Box On the Cheap

Hello, I'm Jim, but many of you might know me already by my forums name realgenius (from the movie) and I'm happy to be the latest member of The Painting Corps. While I do get out and play regularly, I love the hobby aspect of wargaming and spend way to much time scouring the Internet for new ideas and techniques.


Joining The Painting Corps was motivation for me to finally make a cheap photo box. After all, what good is a painting or modeling tutorial without good eye candy? And as an Eldar player, I am often confounded with photographing high contrast models. For example, I have a Biel-Tan army, and many of my Warlocks wear dark green robes and have white helmets or face plates. When I take pictures of these models I either end up with washed-out whites or dark greens so dark you lose the shading details. Hopefully a cheap and easy photo box will fix these problems.


There are several DIY photo box tutorials out there. The main purpose of a photo box is to provide a background and framework for lighting models. And my main purpose is to preserve my money for buying more models, so I decided to build my box with supplies I already had around the house.


Here is what you will need:
  • cardboard box, preferably a heavy-duty shipping box
  • tissue paper or sheer fabric, for light diffusion
  • tape, really any kind will work
  • one or more lamps or other lights
  • off-white, grey or light blue paper or fabric for the background

Make sure you choose a box that is large enough to hold whatever
large items you want to photograph, but not too large that it is going to take up a lot of space or put the light sources too far from small objects you want to photograph.


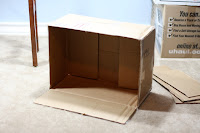
I found the perfect box out in the garage: 18 inches by 13 inches by
9 inches. I didn't want a box that was too deep, since I planned on having the background material spill out of the front to provide more depth if needed.


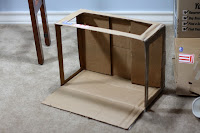
Next cut off three flaps of the top lid and carve out the sides and the top so a frame is remaining. Make sure to trim the sides close to the edge so that you can get maximum light into the box, but leave enough to give it some structure. I left about a 2" border.


Next, secure your diffusion paper or fabric to the frame with some tape and add your background material. I've used paper for background material before, but had some problems with weird reflections, so this time I tried some fabric (from a left over Halloween costume I made for my son). The fabric has good texture, but probably wouldn't be suitable if you are going to crop and add a different background in Photoshop. I'm far too lazy for that, so the fabric will work fine for me. The color will also help warm up the cool colored lights I'm using. If it doesn't work out, it is easy enough to replace with a different colored fabric or paper.


Here's a picture of the final setup, using my painting lamps as light sources. This project took me only about 30 minutes and cost nothing since I had all the materials around the house.


Finally I was able to capture the detail of both my dark colored models and light colored helms. Here is an example WIP Exarch that has heavy contrast, but photographed well. He doesn't have much highlighting now, but I can already see that both the dark highlights and contrast in the helmet will be nicely visible. There's nothing worse that working a long time on delicate shading and highlighting and not being able to capture the effect in a photo. (Not that this model has any delicate shading or highlighting, but...)


For even more options, you can vary the light sources to create different effects and mood. By using or not using the camera's flash, moving the lights behind the diffuser or not using the diffuser and altering the light source height you can create a lot of different lighting effects (top light, side light, hard light, soft light) that can change the appearance of the model.


Good luck and may all your pictures be sharp and well-lit!