
Joining The Painting Corps was motivation for me to finally make a cheap photo box. After all, what good is a painting or modeling tutorial without good eye candy? And as an Eldar player, I am often confounded with photographing high contrast models. For example, I have a Biel-Tan army, and many of my Warlocks wear dark green robes and have white helmets or face plates. When I take pictures of these models I either end up with washed-out whites or dark greens so dark you lose the shading details. Hopefully a cheap and easy photo box will fix these problems.
There are several DIY photo box tutorials out there. The main purpose of a photo box is to provide a background and framework for lighting models. And my main purpose is to preserve my money for buying more models, so I decided to build my box with supplies I already had around the house.
Here is what you will need:
- cardboard box, preferably a heavy-duty shipping box
- tissue paper or sheer fabric, for light diffusion
- tape, really any kind will work
- one or more lamps or other lights
- off-white, grey or light blue paper or fabric for the background
Make sure you choose a box that is large enough to hold whatever
large items you want to photograph, but not too large that it is going to take up a lot of space or put the light sources too far from small objects you want to photograph.

I found the perfect box out in the garage: 18 inches by 13 inches by
9 inches. I didn't want a box that was too deep, since I planned on having the background material spill out of the front to provide more depth if needed.
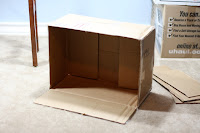
Next cut off three flaps of the top lid and carve out the sides and the top so a frame is remaining. Make sure to trim the sides close to the edge so that you can get maximum light into the box, but leave enough to give it some structure. I left about a 2" border.
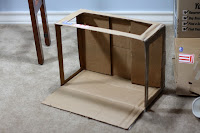
Next, secure your diffusion paper or fabric to the frame with some tape and add your background material. I've used paper for background material before, but had some problems with weird reflections, so this time I tried some fabric (from a left over Halloween costume I made for my son). The fabric has good texture, but probably wouldn't be suitable if you are going to crop and add a different background in Photoshop. I'm far too lazy for that, so the fabric will work fine for me. The color will also help warm up the cool colored lights I'm using. If it doesn't work out, it is easy enough to replace with a different colored fabric or paper.

Here's a picture of the final setup, using my painting lamps as light sources. This project took me only about 30 minutes and cost nothing since I had all the materials around the house.

Finally I was able to capture the detail of both my dark colored models and light colored helms. Here is an example WIP Exarch that has heavy contrast, but photographed well. He doesn't have much highlighting now, but I can already see that both the dark highlights and contrast in the helmet will be nicely visible. There's nothing worse that working a long time on delicate shading and highlighting and not being able to capture the effect in a photo. (Not that this model has any delicate shading or highlighting, but...)

For even more options, you can vary the light sources to create different effects and mood. By using or not using the camera's flash, moving the lights behind the diffuser or not using the diffuser and altering the light source height you can create a lot of different lighting effects (top light, side light, hard light, soft light) that can change the appearance of the model.


Nice job, seems easy enough to do. I like the fact you mention the different background colors.
ReplyDeleteMost of my models I have are dark colored so I've really only used a white background but shooting white models on a white background doesn't work that well so I've had to find some light blue paper to serve as a backdrop for those.
Hey Jim, that's a good post right there! :) Now all I need is a decent camera, and I'll be in business!
ReplyDeleteWhich lighting method do you personally prefer? Do you use the flash? I've heard some complaints that the flash typically washes out the details, but I'm curious what your experience has been.
ReplyDeleteAlso, have you found certain lamps/lightbulbs to be better for certain situations? What kind do you use?
Lately I've found that my biggest problem has been that my camera tends to not capture the figure in the same 'light' as it is in real life.
ReplyDeleteI personally haven't moved to a photo box, but I've experimented a lot with how to angle lighting to get the best light for what I want.
It's only when I get the photos to the computer that I see how dark they really are. Much of the trick to nice photos is good levels manipulation in a photo editor. As long as your original photo was taken with a good amount of light, even with a dark photo, you can always bring it back up to how it looked to you in real life.
I've used the flash, and without flash and depending on the lighting the flash can make things look better.
ReplyDeleteIf you are going for a dramatic side or soft lighting, then you will not want to use the flash or it will ruin your effect.
But if you are going for a straight picture to post, you will want as much light as you can get, and that includes the flash. If the flash is washing out your details then you aren't using enough other light.
It is probably heresy to photo buffs out there, but I use fluorescent bulb that are 5500K light temp. They give off decent light, last a long time and run a lot cooler, so you can pretty much stick the largest bulb you can find into any fixture.
I use a pair of adjustable fixtures from IKEA for photos and painting and when I had incandescent bulbs in there it was just uncomfortably hot after a long painting session. (I usually work with the lights near my head, but below eye level so I don't get light in my eyes.)
The type of lighting you are using shouldn't really be that much of a consideration for taking photos as long as your camera has adjustable white balance. After you get your light box setup, White Balance is really the next hardest thing to figure out, and probably could be a whole article by itself.