20100630

Field Report: Modular Rivers


Warren of LUDstuff! has a nice look at how he put together his river sections.  Some really cool ideas on shapes for each section, giving the sets a lot of variety in the bends and turns possible.  He's also given a few examples of river types if you think your table wouldn't be suitable for a river set.  Head over and check it out!

20100629

On The Table: Ork Warboss


The object of the last quick tip is revealed!  Still heavy in WIP territory, but much further along than I would have guess he would be in so little time.  This scheme really does go on so much faster than nearly any other I've worked on in recent weeks/months.  He has a good amount of work left though, to include one more stage of highlights, a touch of metal work, some freehand checks, and a bunch of detailing.

More on this big lug once I finish painting him!  What have you been working on lately?  Share your links in the comments section!

20100627

Roll Call: Charity Army Up for Auction


GMMStudios has posted an charity army for auction, from the ebay page:

This auction is for a fully painted GMM army, ready to go out of the box.  It contains:

Celestine

10 Sisters, Veteran, Heavy flamer, Flamer

5 Dominions, 4 melta 1 Veteran
5 Seraphim, Veteran, 2 hand flamer

5 Retributors, 4 Heavy Bolter, 1 Veteran

Exorcist
Rhino
Rhino

This auction is 100% for charity.

http://www.insideisaiah.blogspot.com/

Isaiah is a 3rd grade student at Spring Hill Intermediate School.  He has recently returned home after receiving a transplant for his liver, pancreas, and small bowel.  This is the second transplant Isaiah and his family have gone through.  He received an initial transplant in March of 2007 for just small bowel.  This eventually failed and had to be removed in March of 2009.  Over the next six to nine months, he will be required to travel back and forth from home to Omaha, NE.  This also requires the travel of at least one parent and takes considerable time away from work and home as the family is responsible for 100% of his daily cares.

ALL profit from this auction goes directly to his parents to pay for mounting medical and travel bills. Isaiah's dad contacted me and asked me to paint and sell some sisters of his to get the money back out of them in their time of need.  It was such a touching story there was no other option but to go all out!  A BIG thank you to Nick Rose at Bell of Lost Souls (belloflostsouls.com) for donating some MUCH needed sisters. Our list was pretty skimpy before he came along!  PLEASE keep the cause in mind when bidding and DO NOT bid unless you plan to own this army and help out this boy and his family.

The army will be packed very carefully.  I paint miniatures full time and have years of experience shipping minis.


If you've ever thought about picking up a Sisters army, you couldn't do a better than to pick this army up and help out a family in need.  This army costs over $500 in the boxes, and GMM does quality work.  Head over and check it out, maybe you'll be taken in by all the pretty pictures and do some good in the process. 


20100626

Friday Quick Tip: Painting Rust in Two Colors


Some time ago we covered painting rust with just two colors, and at the time I thought I was happy enough with the result, but since then I've found myself more given to a more natural look than the stippled effect I suggested.  This tip will go over a few things I've found myself doing when applying rust in the updated method.  


As my jumping off point I get my metallic parts to a single washed shade.  In this case I've painted the power claw with Boltgun Metal.  The green is VMC Brown Violet painted on in splotchy fashion to create a chipped look straight away.  The entire claw was washed with GW Badab Black and the green was then touched up in a few spots with the Brown Violet to add some depth. 


Some people might not have a grasp of using regular paints as a wash but it's really quite simple to do.  You simply need to take your given color and dip your brush in, then using a good amount of water, thin the paint down to a consistency like above.  I usually only dip the tip of my brush in the paint, touch it to my palette and then load my brush with water.  Swirl your brush through the paint until it has an even consistency and load your brush with the mixture. 


The first color washed on is Vermin Brown.  In this example I've actually gone too light and would likely make it heavier still than this.  This layer though acts more as a filter for the areas you are going to build up more with your second color.  Pay special attention to spots unlikely to have much wear and rub, like around bolts and along joins of armor plates in the crevices. 


The second wash is made of Fiery Orange in this example, but should you not have it on hand, any light orange would do just fine.  Again paying special attention to areas not likely to be worn down too much or those that would gather a fair amount of moisture, I applied the wash heavily and after the initial pass was down, I went back to some areas and stippled more of the wash mixture in.


To finish the effect, I've gone back in with Boltgun Metal along a few edges and touched up the Brown Violet again.  The added detailing of the star was painted freehand and will likely still get a few scratch marks painted in with Brown Violet. 

In the end, the effect is far more natural and more controllable.  It's also more conducive to batch painting that I'll be using to finish off Pattun's Boyz!  Now, to finish off the rest of the model...

20100624

Field Report: Nurgle Lord on Mount


You'll never guess what I was searching for to come across this fantastic Nurgle Lord on mount by Mike at SCW, but I'm glad to see Nurgle get some love for this model.  As a bonus he includes a few good photography tips.

If you've got an article you'd like to get some publicity for that's modeling and painting related, we want to know about it!  Send along a link to ThePaintingCorps@gmail.com!

20100621

On the Table: Sicarius


I had considered this piece pretty well finished when I first posted it to my DakkaDakka project log, but after some feedback I've decided he still requires some additional work in a few areas, namely another level of highlights and a little rework on the metallics.  The additional work shouldn't take terribly long to finish, but really should have been done in the first place.  So back to the painting table he goes for another night.

The model isn't all that hard to paint in my opinion.  Some might consider him covered in detail work that would require a lot of tedious brush work, but in truth you really can simplify these down to washed metallic and keep all of the details alive and vibrant.  The biggest issue I've run into so far is the inside of the cloak that is actually quite hard to reach when the model is assembled and based before paint.  Most everything else has felt quite straight forward.  Here's hoping the touch up work goes just as well.

For those who are looking to see more of our past projects, check out the previous On The Table and Reinforcements articles.  Stay tuned for a Reinforcements piece on Mr. Sicarius.

20100619

Video: Painting Angels Encarmine


Today we're feeding the weekend tips need with a video from LBursley on painting Angels Encarmine Space Marines.  Don't forget you can full screen these and watch them in HD!  It's worth it to see all the little stuff better, namely angle and brush techniques!  Also feel free to leave Les comments here or on his YouTube page


Expect more video work along with the written stuff here on TPC as realgenius and I work to get settled in with video tips as well.  My own work will be more a supplement to the written articles, so stay tuned!

20100618

500 Scavenger Hunt Winner!


We've randomly selected the winner of our 500 Scavenger Hunt, and it just so happened to be the very first entry we received! Congratulations to Robert B. of Texas on his new High Elf Lord on Dragon!

Here is the list of answers for the clues:

1. Stone Walls Tutorial
2. Friday Quick Tip: Paper Tarps
3. How To: Simple Wet Palette
4. Friday Quick Tip: Perfecting Primer
5. Friday Quick Tip: Painting Battle Damage

To everyone who participated, I hope you had fun figuring it all out and maybe even found a few articles you might not have seen in the process! We'll definitely do this again for a future contest, maybe with more cryptic clues though!

On with the next 500 followers and the next few years of tips tricks and ideas for and from the community at large. Thanks to everyone who reads The Painting Corps, you're what keeps us going. Now, what to post for a Friday Quick Tip...?

20100617

Field Report: Tervicons


Wow!  Musings of a Metal Mind is creating a Tyranid+Necron force and these Tervicons are just fantastic. I love the idea of using the Nid Codex for Necrons.  These Tervigons become warp portals for more troops  to come through.  A fantastic idea combining the fluff of Necrons and the mechanics of the Nid Codex.

If you've got an article you'd like to get some publicity for that's modeling and painting related, we want to know about it!  Send along a link to ThePaintingCorps@gmail.com!

20100616

Field Report: Chaos Guard


SonsofTaurus has started work on a great Chaos Guard army.  Bits are from Fantasy Chaos and IG Catachan parts, but I'm getting a strong Mad Max feel.  Hmm, what would make a good Master Blaster?

If you've got an article you'd like to get some publicity for that's modeling and painting related, we want to know about it!  Send along a link to ThePaintingCorps@gmail.com!

Ask the Corps: Comments Apocalypse


 Apparently in the switch to the new blogger template and the addition of Disqus, many of our comments went to the depths of the netherealm.  What's this mean?  All of the great input so many of the community chimed in with for the Ask the Corps articles has been lost!

So now I am putting out a call to all of our readers to help put a few new words of wisdom in the Ask the Corps backlog!   If everyone finds an article in the backlog, gives two cents on the subject they feel they're best suited to answer, we'll be rocking once again!

If you've got a new question you'd like to see covered, shoot us an email at ThePaintingCorps@gmail.com!  See you in the comments sections!

20100615

Field Report: Astorath


Of all the new Blood Angel characters, Astorath the Grim is my favorite.  Paul over at ItsLikeWatchingPaintDry shows off his take on a fantastic sculpt.  Astorath reminds me of the Sting character Feyd-Rautha from Dune.  In fact, if I ever paint an Astorath, I'll probably do him with spiky orange hair and black armor.

If you've got an article you'd like to get some publicity for that's modeling and painting related, we want to know about it!  Send along a link to ThePaintingCorps@gmail.com!

20100614

Contest: 500 'Scavenger Hunt'


It's finally happened, The Painting Corps has hit 500+ followers!  It's been a fantastic journey to this point and the community response has been wonderful.  To thank everyone, we've decided to put on a little contest for our dedicated readers.  It's simple really, I've seeded a few select posts here on TPC and will give a clue to the posts they are contained in, you figure out the posts, send us an email naming each post title according to the clue list and we'll randomly select a winner from the pool of correct answers!

So the big question on everyone's mind "What's the Loot!?"  I dug through my backlog and found a suitably big prize for the contest, a Games Workshop High Elf Lord on Dragon!  The model is unpainted, on the sprue and in the box, though the shrink wrap has long been gone, the model is in perfect condition.


Rules are simple:  Find the posts seeded with the '500' image at the top of this post and send an email to ThePaintingCorps@gmail.com with the list of post titles in order of the clues provided (1, 2, 3 etc.) along with your name and address (for ease of shipping!).

I'll collect the emails as received and they will be assigned a number as I get each one.

At noon (EST) Friday of this week (June 18th, 2010) I will go to random.org and pick the winner who will be announced Saturday morning! 

The Clues:
1. If only the Union knew they were this easy to tackle.
2. Ronald never thought it would be used for that!
3. Hop in the Water's fine!
4. Chunky, Chalky and Fuzzy.
5. Where's the heck is the motor pool!?

One last 'Thank You!' to everyone who's been along for the ride.  If you're an old hat here or a fresh face, we hope you continue to enjoy the things we put out and the sense of community we've been working to build.  Now, get out there and hunt! 

20100613

Video: Painting Space Wolves 13th Company


We've been pushing the community more and more on the airbrush issue.  They just speed things up incredibly and really give fantastic effects.  It's not a complete brush substitute, but the things you can accomplish at a much faster clip make it a near invaluable tool for any hobbyist.  Give this video from LBursley a watch and see a few of the applications first hand.

20100612

In Depth: Chaplain Salvatore Details


Since I posted originally, I've retrieved this guy from scoring at the FLGS contest.  Here are a few more detail pics, along with some notes and thoughts on the process and some of the choices.

20100611

Friday Quick Tip: Space Hulk Basing


There was a plan devised in my skull when I first got my toes wet in the game of Space Hulk so many months ago at BoLSCon.  I was for sure going to see what I could do to get these amazing models out and on the gaming table for a game of 40k.  I didn't want to make it so I couldn't use the pieces in their parent game though, so I had to do some work to make that a reality.  After a lot of delay, I've finally gotten around to working on the models, and in today's tip, I'll go over how I went about basing my Space Hulk Terminators

20100610

Field Report: Sanguinary Priest


Roleplayer over at the Standard Template Construct shows off a fine Sanguinary Priest.  I love the crisp white and just enough red and gold to accent.


If you've got an article you'd like to get some publicity for that's modeling and painting related, we want to know about it!  Send along a link to ThePaintingCorps@gmail.com!

20100609

Field Report: Quick and Effective Blood Angels


Stahly strikes again, this time it's with a great Blood Angels tutorial.  It makes use of a few well known techniques like Drybrushing, Layering, Washing and Hard Lining, but keeps them subtle enough by playing each off the other to create a clean and solid looking model.  The details on top of the armor really help to drive it all home and tighten the model up significantly.  Getting ready to start that Blood Angels army?  You really need to check this tutorial out

If you've got an article you'd like to get some publicity for that's modeling and painting related, we want to know about it!  Send along a link to ThePaintingCorps@gmail.com!

20100605

Reinforcements: Marines Exemplar Chaplain Salvatore


Finally got this guy finished, along with the twenty other guys (just the HQ is painted nicely) for the local game contest.  I did a lot of work practicing the techniques I learned at Adepticon, especially from the Advanced Painting class by Mathieu Fontaine.

The backpack is magnetized; currently he's got a normal pack for the competition, but the jump pack is ready when needed.

If you've got a question feel free to leave it here in the comments section!  C&C is as always very welcome! 

20100604

Roll Call: Win an Army, Do Some Good


Santa Cruz Warhammer is spearheading a charity army build to collect money for Doctors Without Borders.  Each dollar you donate enters you in a chance to win the finished army.

Why would you donate?  Oh, how about the chance to win an army built and painted by Dave Taylor, Thomas Wynn, Jawaballs, Ron Saikowski, Mister Justin, Mik and Mike & John from Santa Cruz Warhammer.

Sounds like a good deal to me!  Head over to SCW and donate using the widget in the upper right hand corner.

This is a great cause and a fantastic chance to win what is sure to be an awesome and unique army. This trooper has made his donation; have you?

Friday Quick Tip: Weathering Pigment Bases


Here's another quick tip I picked up from one of my classes at Adepticon.  I admit, at first I was not that excited with the results when Mathieu Fontaine showed this technique for using weathering pigments for basing in his Weathering class.  But once I got home and was able to try it for myself, I found I really liked it.  I think the long drying time for the pigment fixer makes it difficult to fully appreciate in a short class time.  Anyway, here's my first experiment using weathering pigments for basing.

Here are the tools you'll need for the job: one brush for the pigment, one brush for the fixer, Mig Pigment Fixer and some pigments.  I'm using the APJ Weathering Pigments Les sent to me to check out.  (Note these are the older-style APJ containers, check out the new ones in the APJ Store.)  For this quick rust look I'm using Rust 1 and Rust 3 pigments.


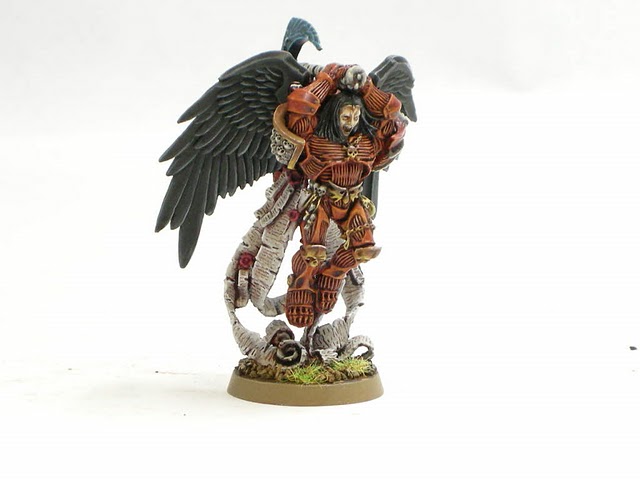
First start with a primed base.  I've got a model on this one, but you can just as easily start with a blank base.  (Or make up a whole bunch of bases for the next time you need to create a squad.)  With this base I wanted the contrast of a granite rock, so I dry-brushed a piece of slate I'd glued down before coating the base with fine masonry sand.


Pick up some of the pigments on your brush and tap the brush on the rim to remove the excess.  It is easy to put more pigment on if you need it, but harder to remove.  And I'm clumsy, so if I load up too much I'm bound to get it all over my desk, making a mess.


Give the base a good coat.  Since this is the foundation layer, make it a little heavier and a little more even.  I'll layer more pigment on top later for some variety.


Once you get the pigments down it is time for the pigment fixer.  Dip your other brush in the fixer and then just touch the brush to the side of the base, letting the capillary action of the fixer soak into the base pigments.  You'll probably have to work around the base, touching the brush in multiple places, to make sure it is completely wet.


Here's what it looks like wet.  Don't worry, it will dry lighter and matte.


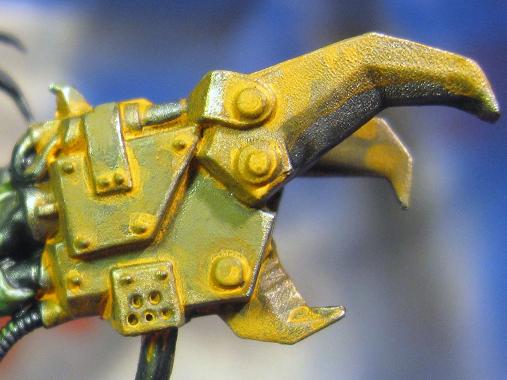
Once the first layer is dry (maybe a half to an hour or more, depending on how much you used and the humidity), lay down a second color of pigment in some areas of the base.  In this case I'm using the Rust 1 as a highlight.  APJ and other pigment makes often have several colors of rust, so you can go for more depth by using more layers than just the two I'm using here.


There you have it.  I'm no geologist, so I'm not sure what sort of rusty lava flow over granite boulders this planet will be, but the base choices were made to complement the red, black and white color scheme of the model.  (On some I'll be picking up the blue hue of the granite in the plasma weapons.)  But use whatever color you like.  Pigments are available in a wide variety of colors from earth to clay to sulfur and even brighter colors; there's enough choice out there for any color of base.


One last note on clean-up: I rinsed the pigment brush out in my painting water, but I used soap and water in the sink to clean up the pigment fixer brush.  It was still pretty supple after basing 20 models, but I'd keep around a dedicated brush for both pigments and pigment fixer just in case.

Have questions? We've got answers! We want to help! If you want to see something covered here on TPC, let us know at ThePaintingCorps@gmail.com or on our Twitter or Facebook page!

20100603

On The Table: Sicarius


I had already planned to paint up this Sicarius model once my Angels Sanguine Terminators were done.  After seeing Ron's fantastic version, I'm definitely inspired to get him painted up.  This piece is for a good friend of mine as part of a collection of character models I've been working on for him.  He'll be standard Ultramarines colors, I know it's not exactly exciting for many, but the model is really neat, and I've not painted the scheme in a while so it will be a fun little break.

If you want to see the other models I've done for him check out the links below:

Ultramarines Terminator Chaplain
Ultramarines Scout Sergeant Telion
Ultramarines Chaplain Cassius

I'll be taking photos along the way, so we'll see what sort of tips come from painting this one!  Stay tuned!

20100602

Field Report: Raven Guard Sicarius


Ron over at From The Warp has been doing a fantastic set of conversions of Space Marine characters to Raven Guard (bonus Shrike link).  They have all been great, but his latest, Captain Sicarius, is just incredible.  Everything on this model works for me; from the head and hand swaps to the color scheme, it is all just perfect.

Got an article you'd like to see featured here on TPC?  Send us a link at ThePaintingCorps@gmail.com and we'll see about getting it up! 

20100601

Reinforcements: Angels Sanguine Terminator Squad


After some marathon painting sessions, the last of which I pulled an all nighter, the first squad of terminators are finished for my Angels Sanguine.  I painted the four new models all at once to save a little time along the way, and while I'm sure I did, it started to bog me down some when it came to the details.  Early on the batch painting was showing it's bonus.  The base colors went down quickly and efficiently, even highlights weren't an issue, but when I got to working on the metallic sections things slowed down considerably.  But in the end, I've got four models to complete out the squad!  


The basing was developed more with these models and additional bits and extras were added to the mix in the form of plastic tubing and metal mesh.  All of the models are magnetized for double duty on the 40k battlefield and in the confines of a Space Hulk.  I believe the look I was after was successfully captured with them. 


The genestealer spine was a big bonus in painting the above model.  It gave me a chance to lay out an idea for my genestealer color scheme without committing to an entire model.  I didn't want to just go normal 'stealer colors for them, and wanted to give a truly alien feel while keeping them grounded in a realistic palette.  I went with a VMC Brown Violet base highlighted a few times by mixing successive amounts of VMC Ivory in to a very thin highlight of pure Ivory.  I went back in with Thraka Green and washed everything and when dry, I hit the fleshy bits with Devlin Mud.  For the gory bits I mixed Devlin Mud with some VMC Flat Red and washed it on. 


Each terminator followed much the same 'recipe' of the first terminator I finished.  It was actually a bit hard to get the colors to match just right, mostly because of the difference in the base zenith white/black base coat.  A bit too much white lead to my models being a bit brighter than I had intended.  A few additional washes helped to tone the models back down, but left them extremely shiny.  I had to use painted on matt varnish, watered down of course, to kill the shine. I hope to work out that issue with the next set of Angels I work on. 


The face on the sergeant was a point of concern when I started this project.  I wasn't up for doing a head change to 'fit the fluff' but figured I could give the model a disturbing look to attribute the fluff to.  I went at the face by first painting VMC Ivory and then washed it with a violet I mixed up from VMC Medium Blue and VMC Flat Red and watered down.  I started picking out the details in thin layers of Ivory and eventually washed it very lightly to punch up the contrast with Devlin Mud.  The eye was painted in with a pale blue to give it a cold almost dead look with no pupil to help reinforce the idea.  I'm really really happy with how it all turned out and capped the head off with by painting the hair with VMC German Grey and picking out the details, along with creating some, with pure Ivory.

I can't wait to start on another squad for these guys, the color scheme is just so striking when finished and was actually a lot of fun to paint.  I've got a Sanguinor on the way from Santa Cruz Warhammer that I'm looking forward to painting up for the force as well as some Assault Marines I've had since BoLSCon waiting for an appropriate project to come along, not to mention the rest of the Space Hulk Terminators to finish off!  For the moment I'll be taking a breather and finishing up another piece that I've been holding off on for a while now.

If you've got a question feel free to leave it here in the comments section!  C&C is as always very welcome!