Continuing to get myself back into the hobby, I've been working on some commission jobs for a few friends. To start things off I got cracking on a Logan Grimnar.
Showing posts with label Space Wolves. Show all posts
20140112
Reinforcements: Logan Grimnar
Continuing to get myself back into the hobby, I've been working on some commission jobs for a few friends. To start things off I got cracking on a Logan Grimnar.
20120630
Space Wolves Rhino
It's been a long, long time since I've had a chance to sit down and paint something for my armies. Things have been extremely busy for the last nine months and have started to finally calm down for a few weeks. It won't last of course, but it's nice to finish a new model when I can!
20110728
Reinforcements: Rune Priest
Making short work of the detail work that was left on my Rune Priest, I was able to get him finished yesterday. The majority of my time taken up by working the metallic areas so that they looked appropriately deep and didn't detract from the rest of the model by overwhelming him. I'm actually quite happy with how this model came out in the end, especially when I was so apprehensive about it when I started this project. It's been some years since I've worked on an old style terminator model and it's good to know you can still make them look cool after all this time.
The model followed the color scheme I've had laid out for some months now and didn't really diverge too greatly from that. The biggest hurdle with this model was defining what areas would be gold and what would be silver. With the Rune detailing taking up so much real estate around the model, I was afraid of them taking the model over and ruining the overall feel. Originally I had these pegged for gold, but thankfully I started washing all of the other details first and was going to go back in on the runes carefully with Sepia. But once I had the major gold sections washed, I began to see the runes in a different light. They had a cool blue hint thanks to all of the Shadow Grey surrounding them and weren't standing out, instead they worked more like a part of the armor and helped to break up the monotony of gold that would have taken things over. I decided to leave them in Mithril Silver and went back on each with a hit of Badab Black to tone them back a little more.
Water-slide transfers can always be a pain, especially on a rounded surface. To help things along, I used a military modelling trick of old and painted the shoulder pad with VMC Gloss. This allows the decal to slide into place easier and helps to blur the edges. I also gave the transfer a few small slits with a hobby knife before placing it on the pad, which will let the transfer buckle in and out a little in areas that would normally pinch. I couldn't use the typical Y pattern that a lot of folks talk about, but instead cut where I could that I could easily fill back in should it spread too much. I was also able to cut it directly on the shoulder at pinching spots, a sharp knife and just enough pressure to cut did the trick. The gloss coat helped to protect the paint in this maneuver as well, so yet another bonus to going with that step! Once the transfer was in place I used Micro-Sol, a dissolving solution, on the decal to soften it up and allow it to form better to the shoulder. When it was dry I used my finger to help stamp down any trouble areas and hit it again with Micro-Sol. Rinse and repeat as needed and it was finally flat to the shoulder. A few spots spread from the cuts I made so I went back in with Chaos Black to fill them back in. A final coat over the entire shoulder pad with VMC Matt Varnish and it was done!
While I was at it with the shoulder Gloss coat, I went ahead and touched the gems with it to give them a little more luster. It's a small thing but seems to work out nicely. I tend to varnish my entire model after it's finished with Krylon Matte Finish Spray, but even through that stage the gloss seems to add a touch more to those areas I've done in it.
One the Matt Varnish was dry, I finally finished the models base using my typical snow method.
I have a lot of old models like this just sitting around in cases and in bits boxes. They never really find the light of day but with this 'test' I might be considering more of them in the future. With this model I get my Space Wolves army up to around 850 points of terrible battlefield ability. Some day I'll add some armor and long range to them but for now they're just pretty to look at and easy to kill!
20110727
On The Table: Old School Rune Priest
Well, affirming that I can never stay with a single project any longer, I've dug in on a new model that just happened to catch my eye a few days ago. This Space Wolves Rune Priest is from the way back days of 2nd Edition and comes from the collection of old wolf models my friend handed over to me when he stepped away from the hobby.
There was just something about seeing it in my cases after getting the Wolf Scouts finished up that made me want to give him some table time. I rummaged through my bases and found a 40mm that I had in resin, unfortunately the base was pre-modeled with details I couldn't use, so I just sanded the top down and pinned the chunk of metal that is an old school terminator to it!
The paint is following my basic scheme for them so far, with the runes being the only real hurdle of thought. I had considered going with gold for them, but after getting the other gold sections down, and seeing the cool blue/silver that has come from the Mithril Silver being surrounded by all of that Shadow Grey tone, I'm quite happy with how it's looking. I did give them a quick hit of Badab Black to give them a little additional depth though.
Labels:
40k,
On The Table,
Space Marines,
Space Wolves
20110720
Reinforcements: Wolf Scouts
Never content with a single project, I found myself drawn from my Angels Sanguine to my Space Wolves once again. This time around, the scouts found the painting table. Some of you might remember I actually started these guys some time ago, only getting so far as their armor and cloth, but as always, I quickly became bored and moved on, leaving these guys to sit in the case waiting their turn. But thanks to some burn out on my latest army project, I caught a glimpse of these guys and decided to give them a go to help break up the monotony.
20110202
On The Table: Long Fangs and Scouts
After their first ill-fated debut on the battlefield, my Space Wolves were found to be woefully lacking in any real power and serious effectiveness. To help boost their combat abilities I've taken to adding new units to the army that aren't just hand to hand monsters.
First on that list was a set of Long Fangs. The squad contains three models from a friends old army that I was able to clean up and remodel. The lascannon trooper was one of my first models from my Grey Death army that had a clumpy and terrible paint job, not exactly something I was proud of having in my case. The sergeant was built 'new' from a bunch of bits and spare parts I had in my bits box with green stuff used to create the pelts and a beard. There is also additional green stuff pelt work on two of the devastator models that weren't explicitly Space Wolves models.
The biggest pain was hunting down old school arms for the right side that are needed to fit into the weapon. New style arms just can't fit right without a lot of cutting and remodeling, not something I was keen on doing when I'm trying to make speed a major part of this army build/paint. Once I was able to find them after digging around in my bits box, I was able to start looking around for a left arm. I ended up just using chainsword arms, sans chainsword of course.
Wolf Scouts have always been a really cool unit to me. Their story and their abilities on the battlefield have always made me want a unit of them. This unit was put together using a bunch of unpainted models from that same army I picked up. I've already gotten knee-deep in the painting process as you can see. In fact this squad was started at the same time as Ragnar Blackmane, but the day after starting both, Ragnar found traction and the scouts were set off to the side to get him finished. With the models around 30% complete, they don't have a ton of time left on the painting table.
So far they have kept to most of the same painting methods and recipes of the other wolves, the cloth being the only addition. I used a Codex Grey base washed with Devlin Mud, and primary highlight of Fortress Grey. Bleached Bone was then used to give the cloth it's true color and Skull White was used as a final highlight.
As a little bonus piece to the army, and since I've had the model forever, I went through my first model case (a fishing tackle box!) and dug out one of my first models. This guy was part of what I had hoped would be a Space Wolves army, but as I've mentioned before, that never came to fruition and he was painted as an early member of the Grey Death marines. Again, not a model I've come to use or be proud of after so many years and so I stripped the model down using Simple Green and a wire brush. This guy will end up being a part of the Wolf Guard once I get around to painting him.
Labels:
40k,
On The Table,
Space Marines,
Space Wolves
20110131
Reinforcements: Ragnar Blackmane
Back in the days of 3rd Edition, I desperately wanted a Space Wolves army. The fates had a different idea as the friend who first introduced me to the game didn't have the colors I would need in order to paint the Wolves in their proper colors. Instead I went with paints that would end up being my Grey Death Space Marines and hence my namesake for all these years!
After well over a decade I've found myself in the position, and of the proper motivation, to build and paint an army that's eluded me for so long. With that comes the chance to paint some models that I've always seen and wanted to paint but didn't have the proper army to do so! Ragnar Blackmane was always one of those models. I tried to paint him some years ago while trying to build a Wolves army but didn't get past a single model.
I painted the model in nearly all the same colors and methods used for the squads of the army. I also used this model to create last Fridays tip on painting Space Wolves armor. The only change up from the regular recipes of the army was his wolf pelts. For those I painted them Codex Grey, but instead of just Devlin Mud, I also gave the pelts a heavy wash of Badab Black over the back and shoulder areas of the fur. The pelts were then drybrushed Codex Grey, then Fortress Grey, and finally Skull White, with each successive highlight lower and less intense than the last.
He's not a full out copy of the GW painted version, but I did steal the idea of his left shoulder wolfs head being gold with yellow detailing 'under' the head. It was a small thing that I really enjoyed about the studio model and wanted to bring into my own piece. Forgoing the other yellow details keeps him more grounded to the army and makes the model feel a touch less busy, which, let's face it, can be quite hard to do on the old 2nd and 3rd Edition models.
This model will likely end up being the man himself when played on the battlefield. One of the first times I'll have taken a Special Character in any of my armies, and a helpful boost in the points department! I look forward to seeing how he fares once he has a ride to deliver him unto his enemies.
20110128
Friday Quick Tip: Space Wolves Armor
Having always wanted a Space Wolves army of my own for over a decade now, the past three weeks I've been hard at work creating a quick and clean old school force that satisfies that need once and for all! Over that short span, I've been able to create a simple recipe that isn't going to steal your precious hobby time!
I've been using Rustoleum Grey sand-able auto primer as my undercoat. I've also premixed two of the ratio steps in old empty paint pots. If you're going to be painting an army of these guys, there's no reason to not have these colors premixed and ready to go to help save time!
To start off I did a base color of Shadow Grey. This lays down a good deep color to build from and work around to create the shadows. But to add an extra touch of shade, I used Devlin Mud to deepen the shadows a touch more. Don't go overboard with the Devlin Mud, just enough to fill in joints and deep areas. It also helps make transitions look smoother between areas of the model that might otherwise have the primer showing through!
The actual base armor color is a 50/50 mix of Shadow Grey/Space Wolves Grey. The mix goes on very easily and covers on nearly a single pass. The trick is to take your time around joins and detail allowing a little of the shade colors to show through. This part is likely the most time consuming of all the steps as your hand needs to be steady and your model stable so you don't ruin the work you laid down prior. Should you muddy up something, don't fret too much, just grab the Devlin Mud and do a little touch up until it's defined again.
To start the highlights I used a 25/75 mix of Shadow Grey/Space Wolves Grey. This step came from necessity as I originally tried to jump straight to Space Wolves Grey but found the change too harsh from one color to the next. Having this thicker line highlight helps to soften the transition and create an extra level of polish.
To finish the armor off I used pure Space Wolves Grey to line the edges of the armor. Keep the lines very think and don't go too heavy with it as it can easily overpower all of the subtleties worked in from the previous step. Another small tip would be not to line every single edge but to pick and choose a few major features to help create the depth and drive focus.
I have a really big soft spot in my hobby heart for this old school clean and bright looking armor. It's nostalgic, but also very striking on the battlefield. Here's to seeing more Wolves around the net in the future!
Labels:
40k,
Painting,
Quick Tip,
Space Marines,
Space Wolves
20110124
Reinforcements: Space Wolves
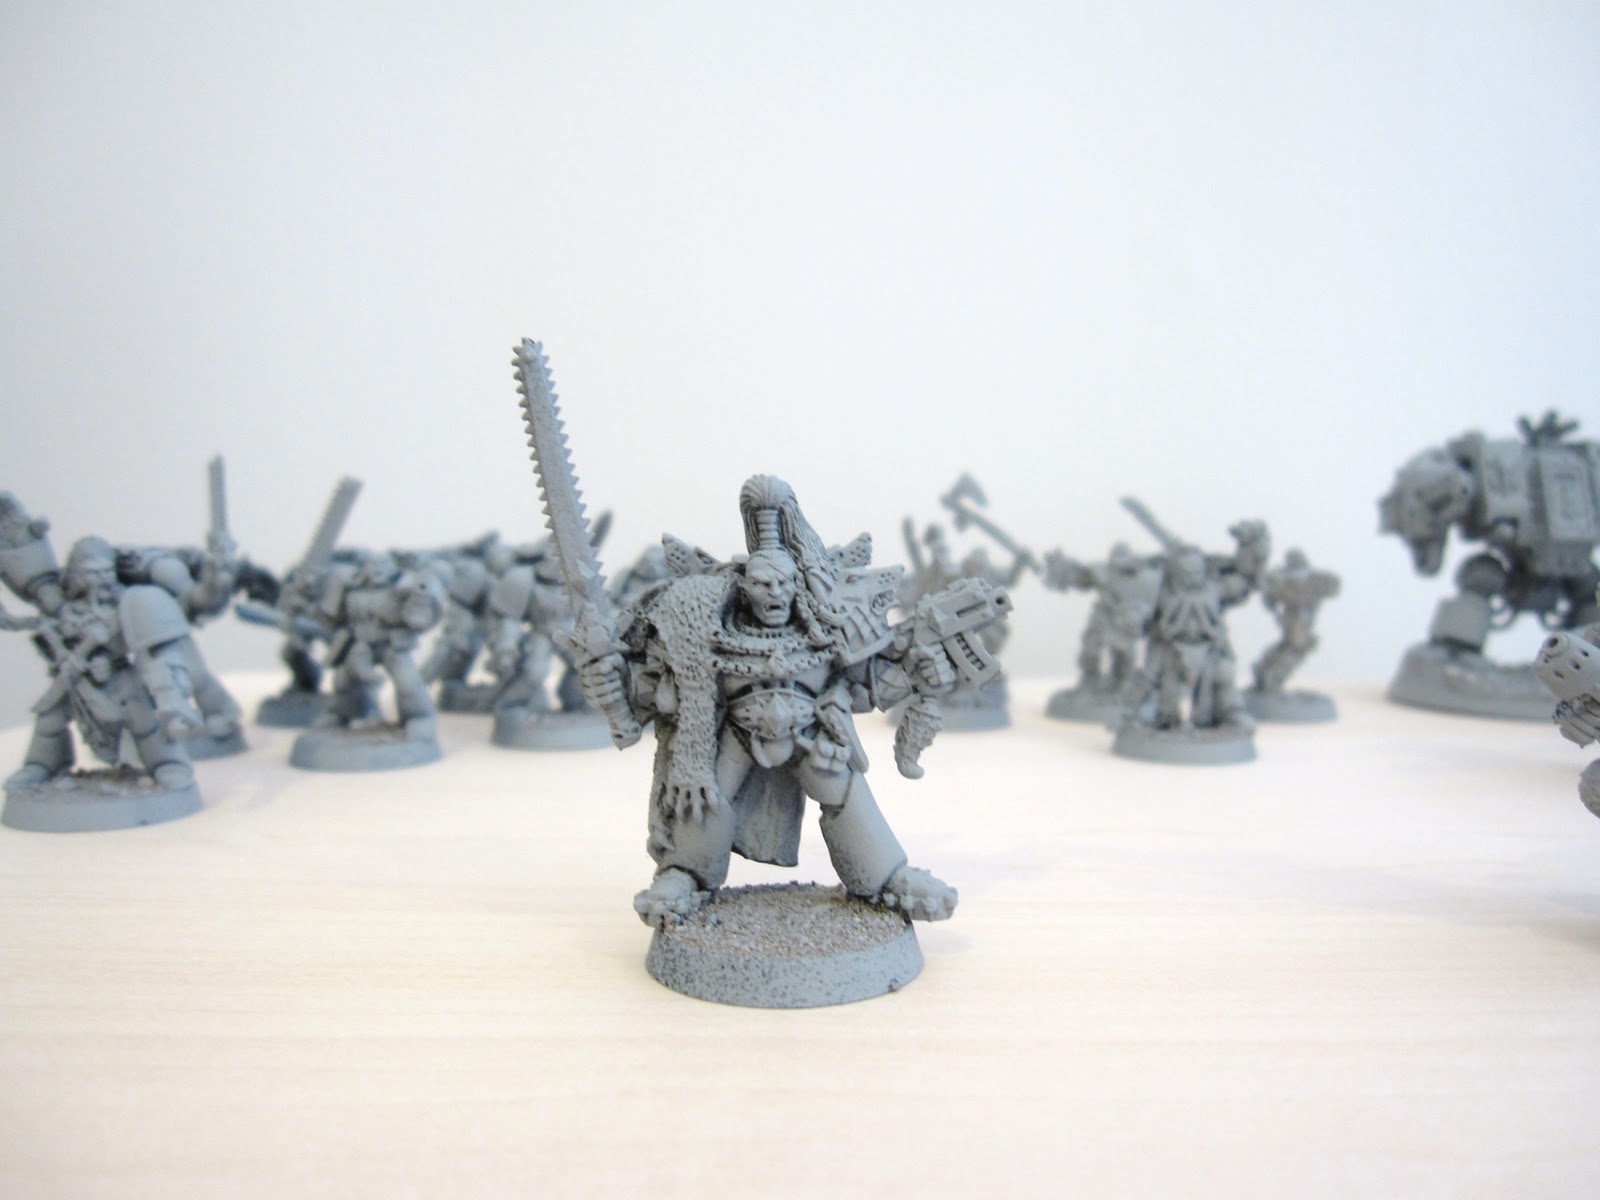
In just over two weeks ago, inspiration struck me after I had finished painting up Lukas The Trickster for a friend. I dug around through a bunch of old models that a friend had given me many years ago and went straight to work on them.
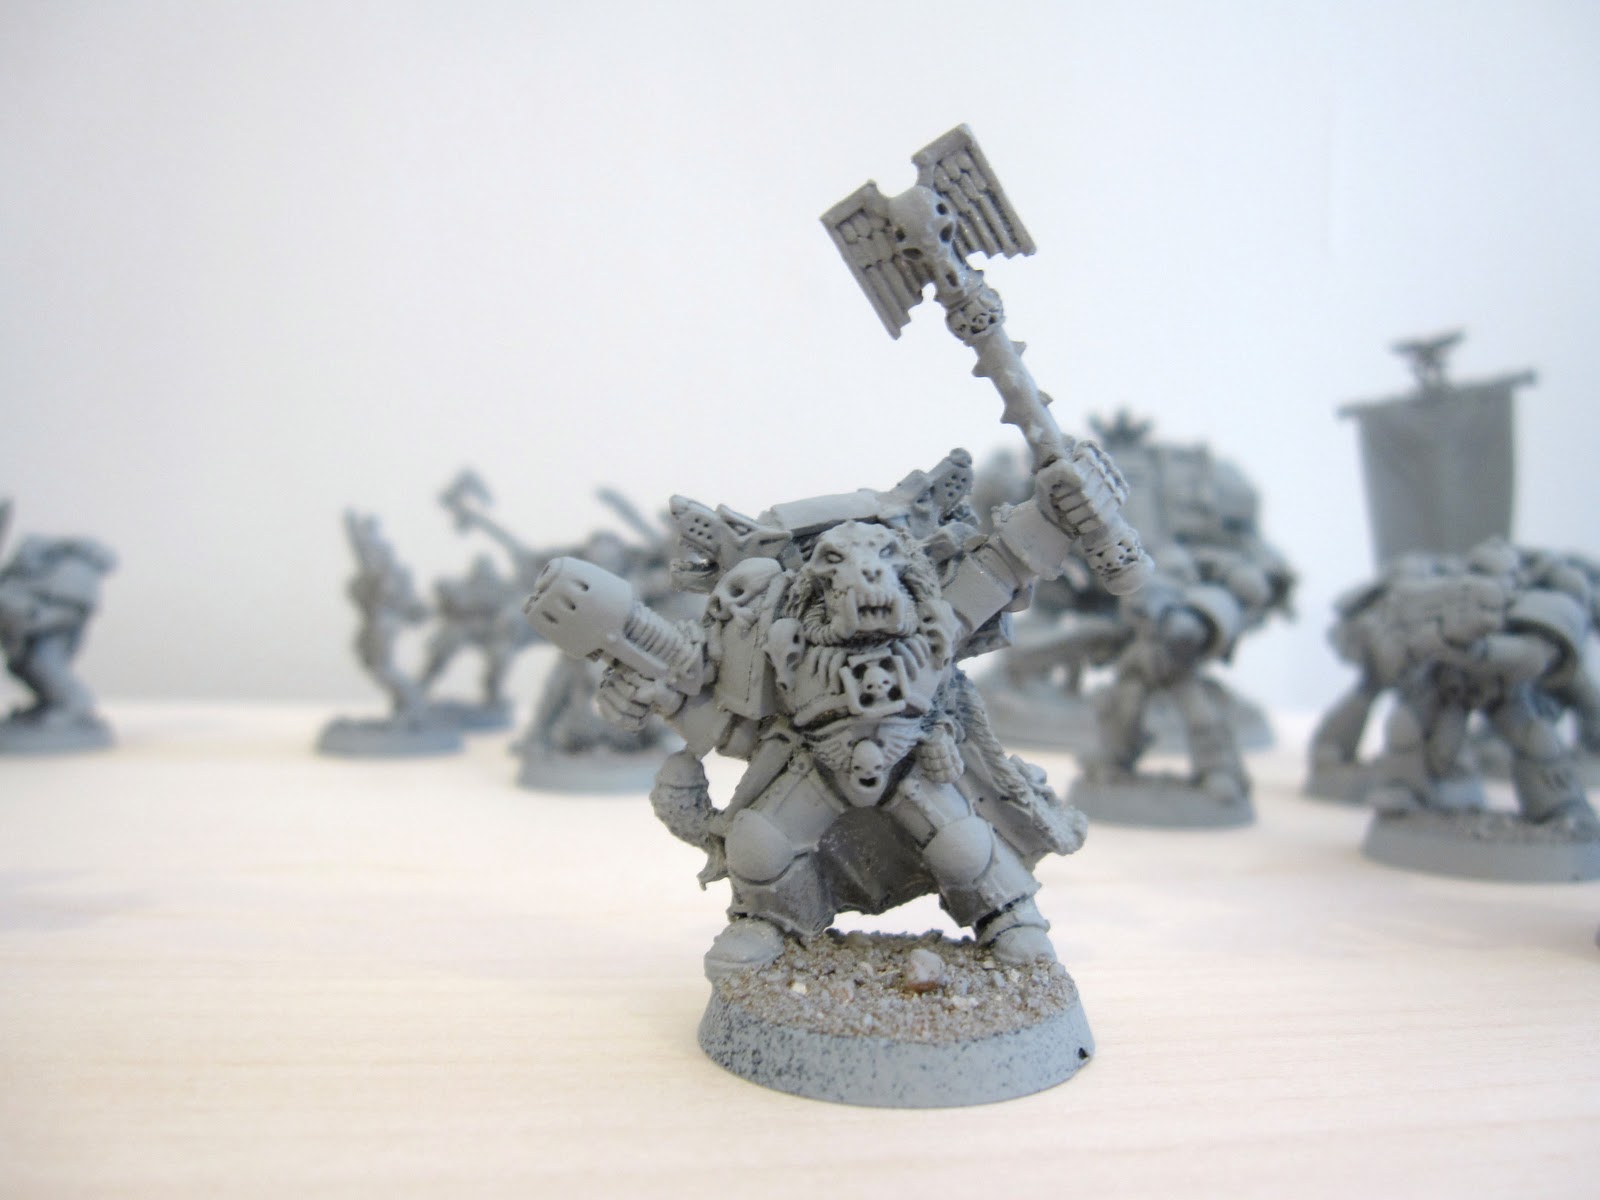
With Dakkacon: Philadelphia on the horizon, I was able to use the drive of wanting a new force for it to really help me press on with the project and bring it all together in time to take the field of battle! I finished up the army the night before I was set to head up and take part in a 500 point mini-campaign. The army as is isn't worth writing home about, but a couple of tweaks to the list should be a big boost to the combat effectiveness! At least they looked pretty getting rolled!
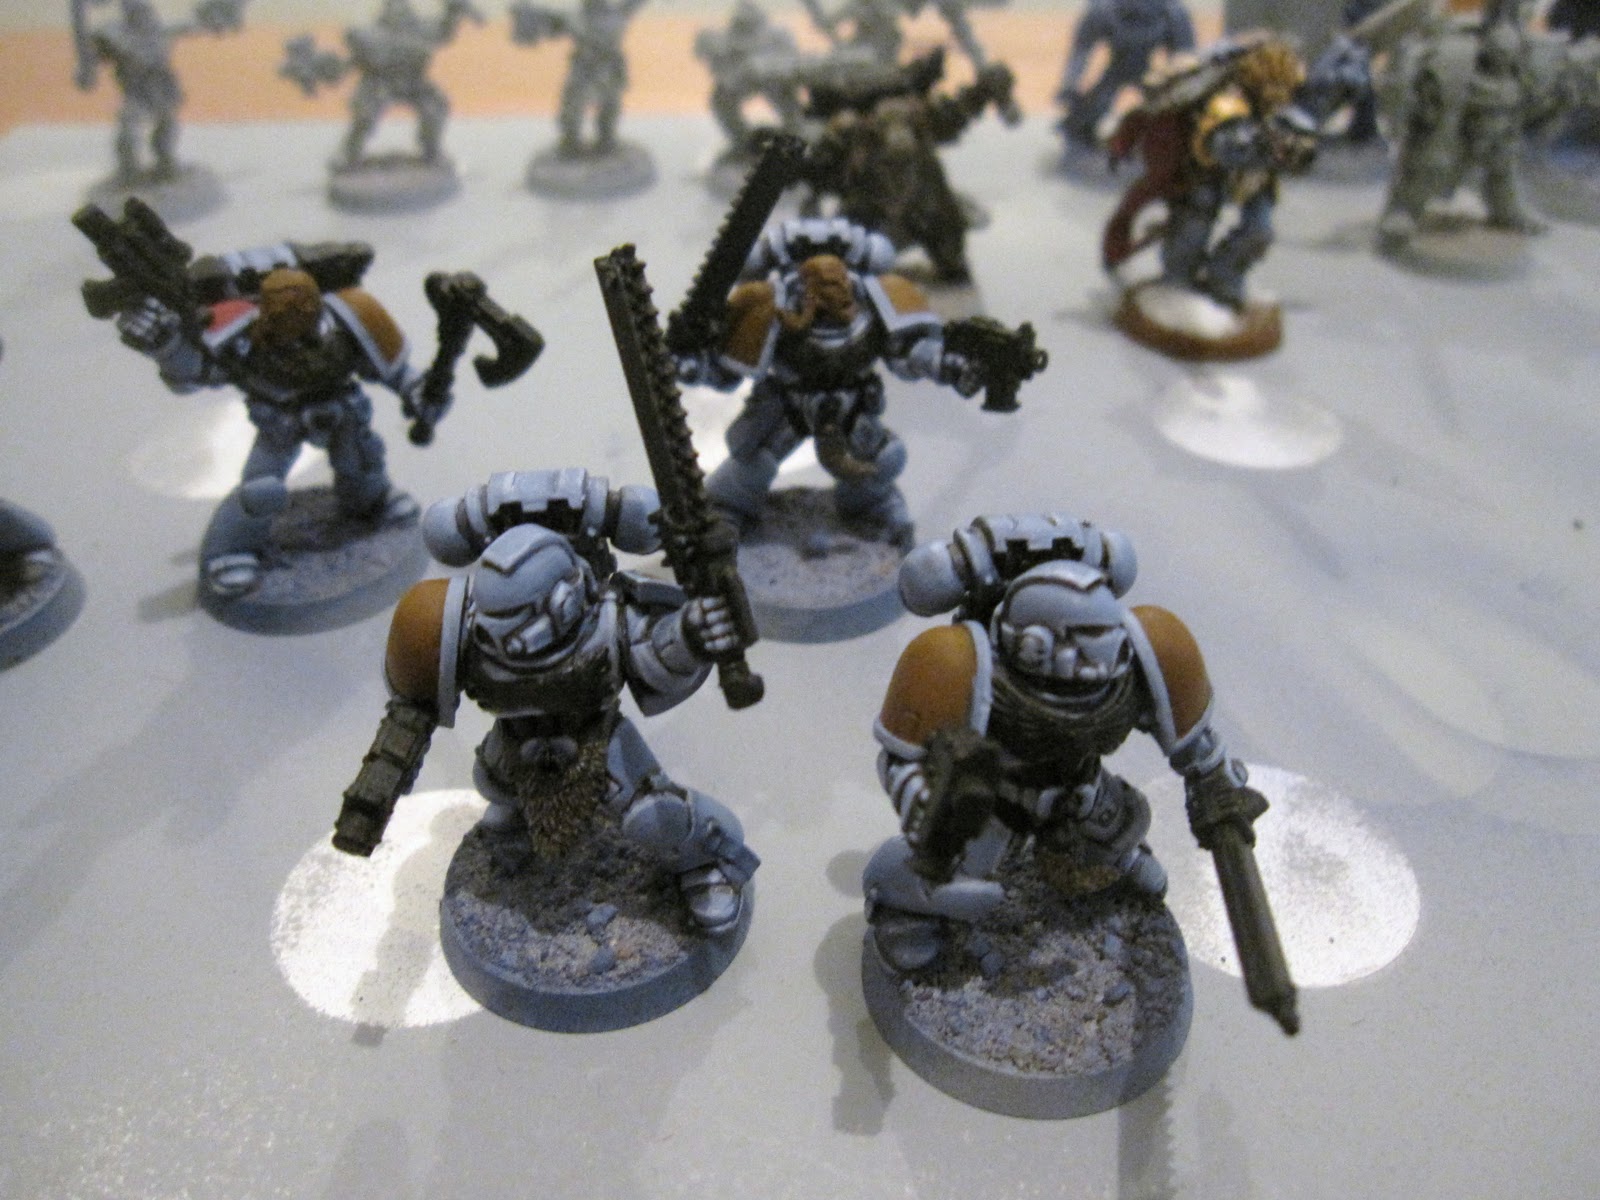
The entire army was painted all at once in an assembly line fashion. I painted each model with a single color until completely finished with that color. This method worked wonderfully for the armor and weaponry but really gets a little hairy when you get into details. I found myself backtracking on a lot of small things that were missed when painting a previous color. But once I was able to get to the bases the assembly line worked wonders again.
For the pack markings I painted the models in batches. This was a point of concern for me as I spent a lot of time trying to figure out just what I wanted to do with them, even after getting them done I wasn't quite sure what I had painted I was going to keep. I had even laid in bed that night considering repainting my Grey Hunter pack markings! In the end though I felt they were strong enough to keep and easy enough to reproduce on future models.
The armor is a Shadow Grey base color that was given a wash to the recesses using Devlin Mud. The armor was then painted with a 50/50 mix of Shadow Grey/Space Wolves Grey leaving the recessed shading showing through. This was mixed previously in a spare paint pot. The armor was then given a heavy highlight of 75/25 Shadow Grey/Space Wolves Grey that was also premixed in a spare pot. A final highlight of pure Space Wolves Grey was painted as a line highlight.
The fur was painted using a Codex Grey base color that was washed with Devlin Mud. Once dry, I used the side of the brush to paint the raised surface of the fur with Codex Grey again. Fortress Grey was then applied in much the same manner leaving some Codex Grey showing. As a final highlight Skull White was applied even lighter.
Reds are done by painting a base color of Mechrite Red, highlighting with Blood Red and given a line highlight of Blazing Orange.
Leathers were painted with Bestial Brown, washed with Devlin Mud and highlighted with Snakebite Leather.
The yellows were base colored with Vallejo Yellow Ochre, the surface was then painted with Vallejo Dark Flesh. This was highlighted using Vallejo Flat Yellow.
Metallic bits were painted Chainmail and washed with Badab Black or Gryphonne Sepia respectively until the color or shade was right.
Weapon casings were painted Chaos Black and highlighted with a Codex Grey line highlight.
Grenades were painted using Vallejo German Uniform, highlighted with a 50/50 mix of German Uniform/Bleached Bone and given a final highlight of Bleached Bone.
The skin was painted Cork Brown, washed with Devlin Mud, highlighted with Cork Brown, given another highlight of Cork Brown/Bleached Bone. A final highlight of Bleached Bone was applied to the highest spots of the face.
The orange/blond hair was painted Bestial Brown, highlighted with Vermin Brown and given a final highlight of Vallejo Dark Flesh.
20110121
On the Table: Space Wolves
They are done! Well, the first approximately 500 points of them are at least! I don't have a ton of time or this would be a full blown Reinforcements update, but I just wanted to share some quick photos before I roll off to sleep in preparation for Dakkacon: Philadelphia tomorrow morning!
The old models were just as much fun to paint as I had hoped they would be. Lots of cool details but thankfully since these aren't character models they aren't completely covered like some others I've painted in the past.
The biggest complaint I have has to be putting the water slide transfers on the shoulders. Marine shoulder pads just are not designed well for applying them, even with the use of micro-sol. Hopefully I can figure that part out on future army additions. Thankfully, future additions will come together quite quickly since all of the colors are worked out for these guys. Expect the Reinforcements of this to be chock full of recipes on these guys!
Labels:
40k,
On The Table,
Space Marines,
Space Wolves
20110117
On The Table: Space Wolves WIP II
The past week has seen solid progress on my Space Wolves 500 point army. The weekend found me away from the painting table far more often than I was able to sit down to it. Overall I only think I was able to find an hour or two to put brush to models, but last week was so successful that I couldn't be too upset! It also helps that it was my birthday weekend and that I got to celebrate it with my lovely wife!
All of the models have started catching detailing work as of late last week. The metallic bits were all blacked out. Pelts and tails have been painted Codex Grey and washed with Devlin Mud. Shoulders have been base colored according to the pack colors and Great Company.
There are three packs at the moment, and each will get the proper colors. The Blood Claws will be Yellow and Red, the Grey Hunters will get Red and Black, and the Wolf Guard will be Yellow and Black. The design will likely be similar to what GW has done with segmented triangles to create the design. I'm going to be painting the Great Company shoulder pads yellow and using Ragnar Blackmane's symbols.
I've started painting the metallic spots slowly this weekend, but thanks to the nature of detail work, it does take a good amount of time to get everything painted on each model. I'm using Mithril Silver as my metallic color for the wolves, but this will be washed down with Badab Black, Devlin Mud and Gryphonne Sepia as the spots dictate. Using Mithril Silver will allow my golds to be nice and bright and can be easily washed down for darker metallics.
I also went through and dug out my collection of Space Wolves transfer sheets late last night. I don't know how much of these I'll end up using, but at the very least having the Great Company badge will be helpful. I was a little surprised as how many of these I've been able to collect having never actually started a Space Wolves army before!
Labels:
40k,
On The Table,
Space Marines,
Space Wolves
20110111
On The Table: Space Wolves WIP
To keep this army moving forward I will likely be sharing a lot of the process of creating it as I go. Things are going well enough so far. Overall it's been pretty painless, with just a lot of armor painting in quick succession. I have yet to delve into detailing each model, but will hopefully try and keep things going in much the same fashion as I have with the armor by going through every model with a single color until it's all completed, then moving on to the next color in the recipe.
The army was airbrushed with Shadow Grey to start off. I didn't go for the airbrush on some models, namely the scouts and Ragnar Blackmane as they didn't have quite enough armor for it to be worthwhile. The armor was then given a Devlin Mud wash to the recesses, not all over the model, but specific point washing to give them some additional depth.
The armor was then painted with a 50/50 mix of Space Wolves Grey/Shadow Grey that I mixed up in a spare paint pot. Having this pre-mix was really key in getting the models done quickly. I then mixed up a 75/25 mix of Space Wolves Grey/Shadow Grey as the primary highlight. Again, this 75/25 mix was done in a spare pot to speed the process up.
Ulrik caught a quick blacking out of the armor and a wash of Devlin Mud to help fill in the recessed areas of the detailing. I've always liked this model, but thought he was ruined some years ago when my dog decided to give him a chew. I stripped the model recently and was happy to find that overall he was still in good shape! He should go quickly enough once I get to him though. He'll likely be one of the last things done for the 500 point list though, if he makes it into that list at all!
Labels:
40k,
On The Table,
Space Wolves
20110105
On The Table: Space Wolves Army
You never know when inspiration to start a crazy project will hit. What's also unknown is in what facility it will manifest itself. Last week I finished up a quick commission piece that I was doing for a buddy. Painting that Lukas the Trickster apparently made my longing want for a space wolves army unbearable at last and I found myself feverishly stripping, remodeling, assembling and converting a bunch of old models I picked up a bunch of years ago from a good friend who stepped out of the game!
There were so many cool and fun old metal models in the mix that I just had to make full use of them all. I have a strong attachment to the old days of 2nd Edition, and have always loved the Space Wolves from those days. A lot of the models I was able to salvage come from those very years when the colors were vibrant, the models a touch static, and the characters powerful! I was able to update most of them with newer power packs, weapons, arms, accessories. I really dove rather deep into the Space Marine bits box to find appropriate weapons etc. for the army to fulfill it's potential.
The hardest thing I found salvaging all of these models was making them fit with the codex restrictions. I had to create a few of the wolves from scratch to help build the army with a few extras as wargear options that could come in handy!
I had to strip the old metal models a few times scraped the paint from the recessed detailing with a wire brush. But in the end that effort made for a lot of characterful units with a strong tie to the old edition. Other models, like the Dreadnought was a part of my old efforts to build a Space Wolves army that never found footing and stayed locked away in cases on my proverbial 'Shelf of Shame'. Now, with that passion for the army renewed, these models get to see the light of day!
There will always be a spot in my heart for static models like the old Space Wolves characters. Ragnar is one of those models I've tried to paint before but got fed up with the over-detailing. This time around, after trudging through many hyper-detailed models for various models, I have more confidence he'll be completed!
Character models also make good double duty pieces for any force. You don't always have to play them as the special character and will be a good stand in for a mundane leader. But always having that option to go big points at the flip of a models rules is one reason I'm always keen to use them. Ulrik will likely lead my early small forces as his mundane counterpart, but once I start getting more finished, and am looking to play higher points, he'll become his real self on the battlefield.
I'm really looking forward to getting these models on the painting table now. I also plan on modeling a display board for the army. That could lead to a lot of future updates and tips as well!
Labels:
On The Table,
Space Wolves
20101230
Reinforcements: Lukas the Trickster
Well, he's not for my army, but he's reinforcing a friends! This guy was a friendly commission done up for an aspiring Space Wolf player. This will be the first of his army to be painted and hopefully, a centerpiece he'll be proud to field!
I had a lot of issues with this model around 45% finished. He's just so busy that it's hard to get your bearings with what you're working on next. I think I stepped away from him a half dozen times to clear my head and not just give up on the piece for a few months! In the end I was able to buckle down and get him finished up, if after a lot longer than I had expected to work on it. Character models just seem to work out like that though.
There would have been a full on video of the painting process had it just been a normal Space Wolf model. But thanks to all of that detail, I got rather fed up with filming and sticking to a set plan of painting. So I put the camera up and just went at the piece as things caught my eye.
A few notes though.
The armor is painted with a 50/50 mix of GW Shadow Grey/GW Space Wolves Grey, washed with a watered down GW Badab Black, touched up again with the 50/50 mix and final highlights are done with pure GW Space Wolves Grey.
The fur was painted GW Codex Grey, washed with GW Gryphonne Sepia, drybrushed with Codex Grey again, highlight drybrushed with GW Fortress Grey and a final drybrushed highlight of GW Skull White on a few of the raised points.
The red of the cloak is done with GW Red Gore highlighted by a 75/25 mix of GW Red Gore/GW Bleached Bone. A few spots were then washed with GW Gryphonne Sepia to add a little added depth.
The yellow of the shoulder pads are done with a base of VMC Dark Flesh highlighted with a 50/50 mix of VMC Dark Flesh/GW Skull White.
Metallics are done using my typical metals method.
Bones and teeth were painted using VMC Ivory washed by GW Gryphonne Sepia touched back up with VMC Ivory.
20101222
On The Table: Lukas the Trickster
I picked up a quick project from my friend UCPesmerga recently to paint up Lukas the Trickster for his brother who is looking to start up a Space Wolves force. I love the odd project from time to time, and I love the Space Wolves, so it wasn't a long conversation!
I have been taking some video of the model's progress as I paint him, but it's a new camera that was graciously sent my way by LBursley and I've yet to get the hang of it just yet, so video quality might be lacking at the moment. I've not reviewed it just yet, but I'm not going to lie and say it's the greatest thing I've done either! At the very least I will have a good list of colors and when they should happen that I will share with you all on how I go about this one.
The next step for Lukas is blacking out of the metallic work as I prepare to move into detailing everything individually. Basing will be simple with just a little snow and drybrushed gravel, all so the future owner can easily reproduce it! Everything should be just about codex for him in terms of coloring etc. No groundbreaking here, just having a little fun painting a fun model! Stay tuned.
Have a video or article you would like to see us cover? Leave a comment! You never know what our next project might be!
20101204
On the Table: WIP Marines Exemplar
Not much moving on the RealGenius painting table these days, but I have managed to make some progress on a few projects. A recent tournament spurred on a little work to get my Marines Exemplar all up to a 3-color standard. This was an 1850 point tournament, so I had to rearrange a few things compared to the 2000 point version. More dogs it is. Oh, and Njal. Hey, that's just the way the points worked out. The Lord on Wolf remains, as does Bjorn.
Njal and my Chooser of the Slain. The Chooser is a celtic warrior from Warlord Games. I got a sprue of them at Adepticon last year and have been using then for objective markers as well. He's got a wolftail talisman, but I've put a bolt pistol on another (objective), which looks as ridiculous as it sounds.
More progress on this guy. The blue fur is gone, which never really worked. The Thunderwolf is too red, so I think he's going to get a lot darker before he's done.
I've recently started working on some Dark Eldar, continuing my tradition of starting something completely different before finishing my current project. And yes, still sitting on the shelf of the painting cabinet: Inquisitor Clouseau, TMM Grey Knights and Huron.
What's on your table? Do you find you get more or less painting done during the Holiday season?
20100804
On The Table: Lord on Juggernaut
Recently Grey_Death showed off progress on his Khorne Lord on a Juggernaut and here's my slightly different take. I'm using him as a Thunderwolf mount for my Wolf Lord in my Marines Exemplar (using Space Wolves Codex).
I did extensive filing work on the head, especially on the snout, to make him a little more wolf-looking. The Juggernaut has a really flat heat, with eyes on the side, so I wanted to round it off and try to give the eyes a more forward presence. The ears and wolf tail talisman on the tail of the Jugger are just a little whimsy.
Working on anything cool lately? Tired of seeing Juggernauts as Thunderwolves? Leave a comment!
20100724
Field Report: Space Wolves
I've never hidden the fact that I love the Space Wolves. One day I shall embark on creating a force of them for my own and they will be glorious. Until that day comes though, I will have to live vicariously through the works of others and collect and cultivate ideas from around the web. I found these fantastic looking Space Wolves on Tower of Heroes. I absolutely love the subtleties of color variation on the armor plates. You should definitely check out the other wolves from this batch. Top notch work.
Labels:
40k,
Field Report,
Space Marines,
Space Wolves
Subscribe to:
Posts (Atom)