I've been working with hill terrain for the past few months as I built my Autumn Foothills Table and it has been one hell of a learning experience and a journey into the world of terrain building. I learned a lot of stuff and really went into a depth with the piece that most folks don't bother doing, either because they feel it's too hard, or it will take too long, or they just haven't been inspired enough to try. With this extremely in depth hill tutorial, I really hope to try and break down some of the barriers folks have when it comes to creating terrain that isn't just good for gaming on, but also easy on the eyes. It's all about giving people the tools they need in order to create a characterful backdrop for their armies to destroy one another on.
You can pick and choose what level of detail for each step you're willing to go to, but I highly encourage folks to give these techniques a try to the very end. You might be surprised at how rewarding the extra attention to detail can be!
Part 1 - ConstructionConstruction of hills is very straight forward. So long as you have the correct tool(s) for the job it's one of the fastest steps in the entire process.
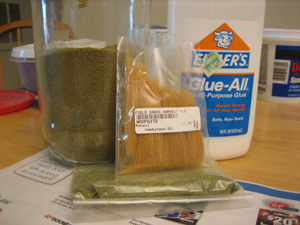
The Tools

Expanded Insulation Foam, Hot Wire Foam Cutter, White PVA Glue, Sandpaper, Paintbrush, Sand
The Design
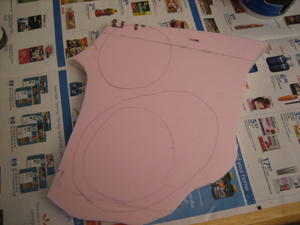
Designing your hill is all up to the creator. Do you want a huge three tier piece? Or something small and versatile one? It's all dependent upon your own personal gaming needs. Just take a pen or marker of some sort and draw out the basic shapes that you want directly on the foam. Having an idea of where any additional tiers of the hill will be placed is advised. As you can see, I chose to go with a two tiered hill and picked out the placement of the second tier before I even cut.
When you're cutting out your design, be sure to cut out large chunks instead of hundreds of small ones. You also need to have an idea of how deep into the middle your hot wire cutter can get before the bar hits so you can plan your cuts accordingly. Cutting out larger chunks wastes foam that can be used in future projects.
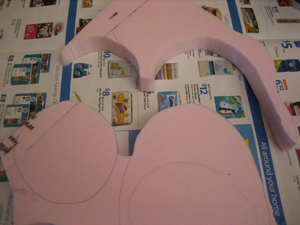
You want to go ahead and dry fit your hill tiers together to make sure you haven't cut too much from your original design. This is just a double check really. This also gives you a chance to place the pieces better for the next step.
The SlopeTo get a slope started on your hill, just angle your hot wire cutter into the hill at about a 35% angle or more depending on the slope angle and look you're going for. Do this for the entire edge of all the tiers of the hill trying to stay somewhat consistent all the way around.
SandingTo help create a more gentle slope look, take a piece of sandpaper to the edges of the hill. I normally start with the top edge and round it off some then sand the entire slope to get rid the cut lines you can see above.
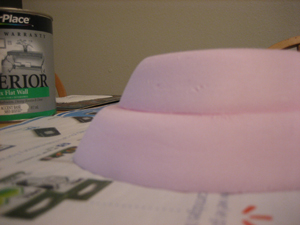
The end results of your sanding should come out something like the photo above. Take note of the small divots in the second tier. You will end up digging into your hill some with the edges of the sand paper. While they're unsightly right now, don't worry yourself over them too much. Smooth out the area around them some and move on, they'll be more than covered up in future steps, and honestly, they add character!
Gluing the Hill TogetherTo put the hill together, simply cover the base of your upper tier(s) with glue. An option at this stage would be to use a 'pinning' technique. You can easily add additional stability by pushing cut down toothpicks into the foam between the two tiers and covering them with glue as well.

You want to push down firmly on the top until you get a small ring of white glue around the rim of the tier. This rim will help secure the tiers firmly to one another.
After pushing the pieces together, you're going to want to clean up the bubbling look of the glue by smearing it around the rim with your finger creating a more seamless look.
Be sure to let your hill dry thoroughly before continuing on.
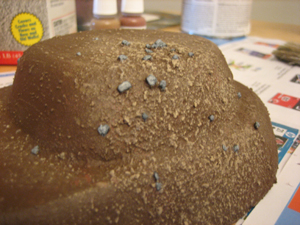
Sand DetailTo add more detail, I use sand and gravels I gathered up around outside of my apartments. You will be amazed at the different types of gravels you can find around where you live if you just take the time to look for them. You can also use sand and ballast you have bought commercially.
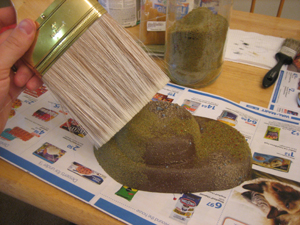
To start off, take your paintbrush and add glue to the spots you want to add some additional detail to. Use a dabbing motion with your brush to help break up the brush strokes especially around the edges of the glue. This will give it a much more random look and as well as help fade the sand into the surrounding areas.
You want to cover the glue completely with your sand and ballast. Just pour it on liberally until there is no glue showing through.
After a few minutes, pick up your hill and shake free any loose sand or rocks by turning the hill upside down and tapping on the bottom.
You can add as much or as little sand detailing as you would like. I chose to go with just two spots for this tutorial as you can see above.
Texturing
This is the step that I get the most questions about when posting my terrain online. When I was just getting started in terrain building, I knew I wanted a simple and effective answer to my texturing needs. So I hit the local DIY store (in this case Home Depot), and got to searching the paint department for a textured paint. What I found was Texture Additive. It is a powder that you buy separately from your paint and add yourself. I found it gave me much greater control over the level of texture that I wanted in my paint and did an amazing job at that. The additive doesn't settle to the bottom of the paint as sand would if you used it as your texture, and coats evenly. Just buy a quart of paint in any color you want and mix it in.
Should you not be able to find anything like Roll-A-Tex, you can just as easily use a fine sand as your mix in.
Roll-A-Tex Fine Texture Additive, House Paint
Paint the entire surface of your hill with your newly mixed textured paint. When painting over your sand detailing, use copious amounts of paint in a dabbing motion to keep from pulling up the sand and to get into all the little crevices for complete coverage. You'll also want to use that same dabbing motion to help break up the brush strokes in the paint.
Let the textured paint dry completely before continuing.
Part 2 - Painting
The painting process can be as simple as base coat and highlight or as detailed as I've laid out here. Again, I challenge you to put in the extra effort and make your terrain stand out from the crowd. (Note: This tutorial was originally published in 2008, and many of these colors no longer exist from Games-Workshop, so just find approximate replacements and you'll be golden! -Aaron)
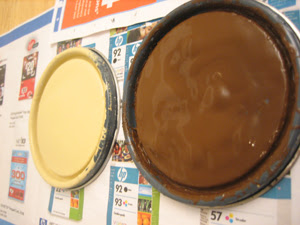
Basecoat ColorHere I've used a house paint that I had specifically color matched to Bestial Brown. Just take a small tab (larger than a quarter) of dried paint to your local DIY that can color match and have them mix up a quart for you. I went with a flat finish for mine and it works out extremely well.

Make sure you coat the entire hill with paint. You don't want any foam showing through. This is merely a protection to the elements as well as any future painting techniques you might want to employ (Spraypaint comes to mind). Just wait for the top to dry and flip the hill over and paint the base as well. This will also help with the continuity of your terrain, as there won't be any pink gaps showing anywhere.
Painting Color VariationsVallejo Model Color US Field Drab, Saddle Brown, Large Brush
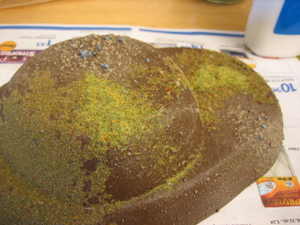
To add some variation to the base color, just pick out a few earth tone colors and dab them into random spots here and there. This helps break up the monotony of the hill some.
I normally chose to add the color variations around rocky areas since these will be seen more in the final product.
To start out the highlighting phase, I use the brown basecoat paint from before and mix it with a Bleached Bone color (color matched just like the brown was) 50/50.
I usually just dip an old paintbrush directly into the colors and mix them off to the side on my newspaper. Just be sure to get right to drybrushing when you do this! You don't want your paint drying out on you.
Above you can see the 50/50 highlight. Additional focus should be paid to your sandy and rocky areas to help bring out the detail. Let the paint dry completely before moving on.
For my final highlight I use the straight Bleached Bone color in a much lighter drybrush over the hill. This accentuates the details even more while adding subtle variation.
Rock Detailing
This is a step I enjoy far more than I should. The idea is a simple one: Look for big rocks to paint. If it's larger than sand, I paint it. This step adds so much character to your terrain that I'm surprised that I don't see it more often. Hopefully that will change in the future!
The colors you use are up to you. I've chosen to paint my rocks grey and have picked the colors accordingly. The only advice I can give you when choosing your rock color is to pick something natural but something that stands out from your base coat and highlighting.
Stage 1 Rock Detailing: Chaos Black
 Stage 2 Rock Detailing: Codex Grey
 Stage 3 Rock Detailing: Fortress Grey Drybrush
Games Workshop Bleached Bone, Small Drybrush As an optional step, I throw a final light drybrush of Bleached Bone on the rocks to help tie them in more with the surrounding terrain.
Part 3 - Ground Cover
Adding ground cover to your hill such as flock, foliage, bushes and grasses really brings the whole project to life. It's also one of the more time consuming parts of the project as you really need to let the glue dry completely before moving on to each step.
 Woodland Scenics Blended Turf, Tall Grass, Games Workshop Static Grass
I use a variety of materials for my ground cover. Woodland Scenics makes some amazing products at a price that won't break the bank. And you'll have TONS of the stuff left for many more projects to come. The only thing I haven't found locally is a static grass, so I use Games Workshops to good effect. Again, this is a product that works great and you'll have lots left if you conserve what you don't end up using.
To start out you will want to apply PVA glue in a dabbing fashion (do you see a pattern yet?) in a few large areas on the hill. How much is up to you, but try and be consistent with future projects.
Cover the glue completely with your flock. You'll want to definitely have a paper down for this stage to help catch all of the excess flocking.

After a few minutes turn the hill upside down and shake off any excess flock. At this point you can reclaim all that wonderful unused flock for another day!
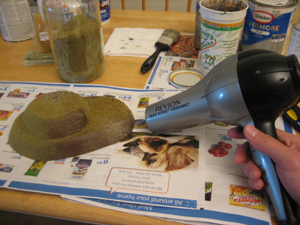
I normally use a hair dryer to blow away any loose flock still being stubborn and to help speed up the drying process. It won't dry the glue completely though, that just takes time. Don't move on to the next stage until the glue has dried 100%. You'll regret it if you do!
Once dry, take a large paint brush and gently brush the flock. This will remove all of the excess flock from the hill that's not glued down. This step keeps things tidy for the future and off the bases of your models! Again, don't attempt this unless your glue is 100% dry. I've made the mistakes for you people!
Grass VariationAt this point we want to add a bit of variation to the grasses by adding some small patches of static grass. Just a few small dabs of glue applied with a paintbrush will do the trick.
Static grass is a bit trickier to apply to the hill. Your best bet is to take pinches of the stuff between your fingers and sprinkle it over the glue by twisting it between your fingers. This will break up the balls of grass that seem to form in the bag.
Once applied, you can turn the hill over and shake away the excess and salvage it. Blow lightly on the static grass while it's upside down to help stand it up.
BushesWoodland Scenics Lichen
For bushes I use Woodland Scenics Lichen. It's a slightly fickle product, but I like the effect it gives and it looks more natural. But lichen has it's downsides. If it dries out, it can turn to dust on you and leave your bushes in shambles. I haven't encountered this problem yet, but others have. Woodland Scenics also makes a clump foliage that is synthetic which alleviates this little issue and looks good as well. You can use it in much the same way as I use the lichen here.
To start, you'll want a large gob of PVA glue. The lichen will end up soaking up much of this and help solidify it to the hill.
Add the lichen in small clumps by pressing it down into the glue and holding for a few seconds. Leave the lichen in place and don't touch it as it will come up rather easily at this stage.
Add as much lichen or clump foliage as you deem necessary. I normally add more than one group of bushes on any given terrain piece to help bring them to life more.
Tall Grass
Tall Grass is a nice addition to the overall look of the hill so far. And it's easy to add once you've done it a few times. I came up with a simple enough way to get the effect I wanted without wasting too much time.
To start out, I take the Woodland Scenics Tall Grass and cut a small tuft of it in half with a pair of scissors. This scales the stuff down well for what the wargames I play, and gives me a nice even edge to plant the grass with.
To plant the grasses, make a small dot of glue in the spot you want to add the grass. Now either let the glue dot dry some on its own, or take a hair dryer to it for a short while until it's got some surface tension. Just take the even ends of your grass and push it into the glue dot. You might have to hold the grass in place depending on the consistency of the glue.
Once the glue is completely dry, take your scissors and trim the grass so that its more even. I normally trim it down in a somewhat erratic fashion to keep it looking natural. Blow away any clippings that remain.
Part 4 - The Results
You made it! You've just finished creating a tiny work of art and it's ready for battle!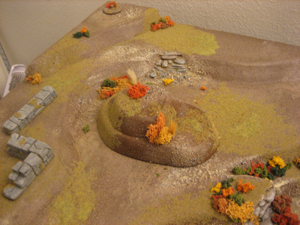
Conclusion
In the end, all the steps are worth the effort. To have terrain that not only is functional but also looks great is something I strive for with every piece I make. And I hope you take something away from reading my ramblings. Every step has some little nuance that I tried to shed some light on since I hadn't had much shed for me when I was looking around trying to figure out how to make things. Yeah, it's just a hill. But it's a great looking hill! Thanks for reading.