Showing posts with label How To. Show all posts

20110722

Friday Quick Tip: Snow Basing (Video)


In continuation of the video series going back through some of the written tips here on TPC, I took some time to film my snow basing method as I was finishing up my Wolf Scouts earlier this week.  It's a quick little tip, and hopefully it gives a touch more insight into how to go about it. 

20110715

Friday Quick Tip: Sponge Weathering (Video)


Today I'm bringing you what I hope will become the first in many of the tips we've run here on The Painting Corps in video format.  There is a lot that might be getting lost in the translation from my table top, to text, to your table top.  So in an effort to help those who might be skittish about trying out some of the more fun techniques we've covered on TPC, I'll be going back and showing things as I do them.  The end result will hopefully be a more robust tip catalog and a more useful one!


It's not much to look at, no flashy intros and outros, but for now it'll do! I might go back in and add some things to the video to help with the breakdowns, but it gets the information out there, shows you how to do it, and gets you painting faster!

If you are newer to TPC and looking for some additional write up info on this method and a bunch of other weathering techniques that might help, be sure to check out the weathering tag.  If it's more videos you're in the market for, you can check out TPC's youtube page for a few more offerings we've posted in the past.  There isn't a lot up yet, but here's to the future!

Thanks for watching, and if you have something you would love to see covered here on TPC, leave us a comment, or shoot us an email at ThePaintingCorps@gmail.com!

20110506

Friday Quick Tip: Full Water Bases


One suggestion for my Fire Hawk army was a deep blue color to contrast the predominance of yellow and orange.  Immediately I thought of water basing.  I've wanted to experiment with clear casting resin for a while and I finally broke down decided now was the time to give it a try.

20110316

How To: Painting Dark Eldar Mandrakes


In Part 1 I went through preparation of Dark Eldar Mandrakes and here's the companion to that article that covers a little of my painting thought process and actually getting them painted.

20110225

Field Report: Painting Mantis Warriors


With this coming Tuesday being the due date for my transfer application, to say that my hobby time has been lacking is a slight understatement.  Luckily, my network of hobby friends runs nice and deep with a ton of great stuff coming out all the time! 

Today I'm bringing another faction from the Badab War to your attention, The Mantis Warriors.  My friend daKing has been a renegade commander for a few years now when Bell of Lost Souls Badab War campaign book was just starting to come together.  In one of his latest posts on his blog daKINGsays he breaks down his method for painting his force

Head over, check it out, and leave him some comment love!  If you've got a good link for the Badab War, shoot it to us at ThePaintingCorps@gmail.com so we can feature and share it with everyone here! 

20110204

Friday Quick Tip: Sandstone/Limestone Cliff/Hill Face


With classes picking back up, time is at a premium yet again.  A lot of introductions and supply lists for my latest batch of art supplies this week.  But in trying to keep with my wants for this school semester I've been working on a small terrain piece in the form of a display board.  With a few ideas floating around in my head I got knee deep into modeling it and found a nice way of carving out a rather convincing hill face that won't eat up your nights. 

The supplies needed are minor at worst.  A hobby knife, pink/blue insulation foam, a large paint brush, and some white glue.  You'll also end up using your hands for this one, so be prepared to dig your mitts into that foam.  Shorter fingernails will likely work best for this as you won't want to dig too much into the foam.


Some of you might remember my extremely extensive Hills Tutorial from a few years back.  These hills have started their life in much the same way as those, with a hot wire cut slope.  But that's mostly where the similarities will end.  The angle I use is aesthetically pleasing and works nicely for gaming as well as it's a shallow cut that keeps the lost space to a minimum.  In the image above to the right you can see the angle nicely.  


To start things off, I went at the side of the hill with the utility knife cutting a lot of shallow lines in a crosshatching pattern.  The knife blade should dig into the foam around a quarter of an inch.  Be sure to use lengthwise cuts as well as the regular x-patterned ones.  These lengthwise cuts will be useful in creating a striated layered look.  Just be careful!  I found myself getting lazy a few times, almost cutting myself as I hacked away!  Luckily, all of my fingers are still in place with no jagged stitch-work by a young nervous intern.


Go the full length of the hill side you're working on, and if you have any other hills/segments to work on, you might as well have at them as well to save some time!  Take note of the top and bottom edges of the foam in the photo above though.  I wasn't afraid to cut around those areas and you shouldn't be either!  You need that randomness to the edges as well and if you get too crazy with the knife, you can always patch that area up a little later with some rocks and gravel.  


Now that the length of the foam is crosshatched and roughed up, you can get to the heart of the work and create a craggy rough appearance.  To start off, run your fingers into the grooves and rip up some of the foam.  You want to create longish grooves and dig out some spots to make overhangs in some places.  This is extremely messy, so pick a spot, and stick to it.  A spot that you can easily vacuum around will be best.  Be sure you're not getting it up around your face either, you don't need this stuff to embed somewhere deep in your lungs.


To help out the grooves and striated look, take your hobby knife with the knife blade as you see above and drag it along in some places to really dig into the foam and build your layers.  This will really help drive the aesthetic home and gives you a little more control over the final look.  The big thing for your finished hill side is to get rid of any hanging foam.  Drag your hand lightly along the cliff face a bunch of times and most of the loose bits will fall away.  


To help seal the side of the hill and keep it from flaking away on you, you'll want to seal it with some watered down PVA White Glue.  Just apply the white glue loosely from the bottle onto the hill face and using a watery paint brush wash the entire surface in glue.  Be sure to use plenty of glue and plenty of water to get into all of the nooks and crannies all along the hill.  Allow the glue to fully dry and give it another coat.  After one coat the hill side was firmed up but not quite solid enough to withstand much punishment, with two it seems much more game worthy.  


My biggest worry when I started the hills was that the foam would break away and the entire experiment would be a wash.  But thanks to a few glue washes, all of my fears were left behind.  I'm very happy with the effect I've been able to achieve with such simple tools and in quick fashion.  This is an interesting take on what can otherwise be a bland area of your terrain, and while it might not be something you would use on every single hill face, it could definitely break up the monotony of your gentile rolling slopes!

Expect more from this project as I move forward with it.  The techniques I am testing out with this will likely find their way into a full on gaming table project later this year!

20110113

Video: Painting Death Guard


Les comes back this week with another great video with yet more cool ideas for painting your models quickly and efficiently.  Those of you looking to do Death Guard would be well served checking this video out, though be forewarned that much of the paint work is done via an airbrush.


The big kicker for this video is the gloss varnish/alcohol clean up trick.  I really really really like that idea for tabletop model completion speed.  I've seen similar done with scale model tanks and oil washes before but never a 25mm infantry type model. I really feel like this could work on a variety of models with some practice. 

If you're not wise to the ways of the airbrush just yet, you really should consider picking one up if you've got a little extra hobby funding.  The time saved on something as simple as base color alone is worth a cheap rig.  If you're uncertain what you should be looking for in an airbrush, be sure to check out our series of airbrushing articles

The techniques used in this video could be used on a variety of different models, especially other Chaos Marines Legions, it just comes down to picking out a color recipe!  Any ideas for other models you might make good use of some of the things picked up from watching the video?

20110104

Video: Dark Eldar Last Hatred


Les brings another scheme from Codex Dark Eldar to video for those looking for inspiration for your new army. Many of the same techniques as from the last with updated colors for the Last Hatred Kabal. I really want to give his blood splattering a try!


Full view, HD it! Watch, learn, enjoy!  Be sure you head over to Les' youtube site and check out all the other great videos he's put together!

20101229

Breakdown: Sons of Medusa Desert Support

 
I've been meaning to do some "How To"'s on the Sons of Medusa for a long time now, but unfortunately, I just haven't gotten around to it.  I've had a lot of folks ask how I paint them over the last year or so and I thought I would take some time to at least put the colors down in one place for them.

20100924

Friday Quick Tip: Crimson Fists Video


 Les has put out another great Space Marine video, this time painting Crimson Fists!  I've always loved the deep blue of the chapter, and here Les is doing them some serious justice.  HD, Full Screen!


Watch, learn, try something new! Good to see some more painting videos coming from our buddy Les! Hope the video finds you all well today, and in time for that new project we were just talking about earlier this week!

20100910

Friday Quick Tip: Ork Skin Video


I have really taken to filming my painting sessions.  It's given me a nice new outlet to share tips and tricks with.  It's also a great way to learn how to edit video!  Today I bring a tip from my latest footage, painting Ork skin.

To preface, I never approach a models skin the same way twice.  I've made mention of my love of variety with skin tones before, and have made more headway in that effort with my Orks.  With each boy, nob and warboss, I've played around with the colors on a whim, never really bothering to remember or write down just how I got to a finished skin tone.  But with that in mind, I thought it would be a good way to show the process by filming as I painted my latest Ork model. 

They're set at double speed, with queues for colors used, so it shouldn't be too hard to follow!  With that in mind, give the videos a watch! 


You might notice that at one point I go to using a watered down Bleached Bone, though I found it to be a little too strong for where I was at with the model.  I ended up using a 50/50 mix of Bleached Bone/Goblin Green instead and did a final highlight of pure bleached bone.  It worked out better, and faster, than it would have had I not used the mix. 

The matt varnish is used to knock out some of the shine.  I still think he could go for another hit of it, but will wait until the model is finished and do a complete spray of the model with the airbrush instead of painting it on.  Using washes will leave you with a lot of shine, so be prepared to kill it off.


I really dig some of the music I'm finding on youtube!  I hope you enjoyed the videos and here's to it helping a few of you out there!  I'd love some feedback as well, let me know what you think!

20100905

Video: Painting Fur

Took some video while I tested out some different fur colors the other day on my beastman. Gave it a quick edit to try my hand at some video editing. I'm still getting my legs with the program, but I suspect I'll have the hang of things soon enough and the videos will look all the better for it!

It's double speed with queues so it should be easy enough to follow. I went without sound for now, still working out how to edit music and voice in. So throw on some music and give it a watch!


Materials used:
Size 4 round watercolor synthetic brush
Vallejo Model Color and Games Workshop paints
Wet palette
Liquitex Flow Aid

There was a focus issue early on in the video, but I kept it because it shows the use of the palette well. Plus it's just washing!

Be sure to watch it at 480p! Let me know what works for you and what doesn't. I want to make these better with each video!

20100827

Friday Quick Tip: Using the Wet Palette


When I posted the wet palette Friday Quick Tip, the number one follow up comment/email was, "Great! Now what?"

As part of the Masterclass, here's a little quick tip direct from Mathiue Fontaine on how to make use of the wet palette and get your model started off with a nice, even base coat.


Some of the key tips: don't thin all of your paint at once, don't get paint up into the ferrule (metal part) and use the side of the brush for base coating.

More from Mathieu and his painting Masterclasses at his site: http://www.akaranseth.com.

Are you using a wet palette? Any good tips for wet palette beginners out there?

20100716

Friday Quick Tip: Airbrushing Even Base Color Video


The fifth in our continuing series on airbrushing:


How many times have you seen this?  You just got back into your hobby room, you thought you had a nice even coat, but because you couldn't manipulate the model too much you couldn't see all of the underlying spots that didn't catch any of the paint! 


You could just slop the paint into the crevices, but even a watered down coat can give you fits in terms of evenness.  Since getting my airbrush, I have made short work of these spots by using the airbrush to reach deep and kept the base coat nice and even. 


This is how I go about adding an actual base color to my models, not just typical 'primer' colors.  If a model is predominately going to be blue, red, green, what have you, I'll spray the model that color and pick out the rest with a brush.  Or if you want to get crazy, mask things off and spray various colors for a nice smooth coat. 


There are a few small tips within the tip as to typical airbrush use and practices.  Drying areas with just air (dual action users only!), quick bursts, keeping the brush moving, etc.  This is a good way to get used to your airbrush without worrying too much about ruining your model.  I highly suggest this as a good starting point for any new users. 

What other basic airbrush uses are there for new users to test out their new equipment?  Have a good drill or simple but effective method for models that even the newest user could work with?  Let's hear it!

20100715

Video: Airbush Mash Up


We don't claim to have all the answers!  As evident with most articles ending with an open question to all the readers of TPC to add their knowledge and expertise in a given area via the comments.  I know my airbrushing techniques will become more and more involved as time wears on, but today I took some time to work out a few videos showing a few small things that might help a few of you along as you get started.

To start out, I made a test video showing assembly of an airbrush.  The video shows me putting together my
Paasche Model VL
and it might not seem like much, but I remember calling LBursley to make sure I didn't screw anything up in disassembling and assembling this thing when I first got it!


Next up in the video shorts series created today was a small video on mixing your acrylics.  In the video I use Windex, I have had no troubles with colors changing on me from the blue tint of the cleaner, and the fast dry time that some bemoan, I actually like.  There are actual airbrush thinners (Liquitex Airbrush Medium) on the market though for those looking to do something more and they likely do work better than a stop gap like Windex!  But for a starter, you'd be hard pressed to get as much thinning medium for as cheap. 


In the final video short, I show my mid-use cleaning method. I spray a few cups worth of Windex through the airbrush until no more pigment is showing in the spray. I find it a good way to clean the brush between colors in a single session of painting, or when I need to take a short break but don't have the time for a full out break down and cleaning.


As I get more comfortable and upgrade my set up for video, I hope to create far more of these video shorts and even full length tutorials in the future. There are just some things that work out better with video.

So, what do you do for thinning your paints for airbrushing? Have a favorite medium you've been using lately? Have any thoughts on ratios/mixes that work best for different things? What about quick cleanings? Let's hear what you have to say about the subjects!

20100709

Friday Quick Tip: Glass Bead Rivets


I've never gotten too deep into scratch building or kit bashing in all of my years of wargaming.  But the need has arisen as of late to get serious about both and with that comes new ideas, tips and techniques.  Today I am sharing a method I've known about for some time, but never gave a try, Glass Bead Rivets.

20100626

Friday Quick Tip: Painting Rust in Two Colors


Some time ago we covered painting rust with just two colors, and at the time I thought I was happy enough with the result, but since then I've found myself more given to a more natural look than the stippled effect I suggested.  This tip will go over a few things I've found myself doing when applying rust in the updated method.  


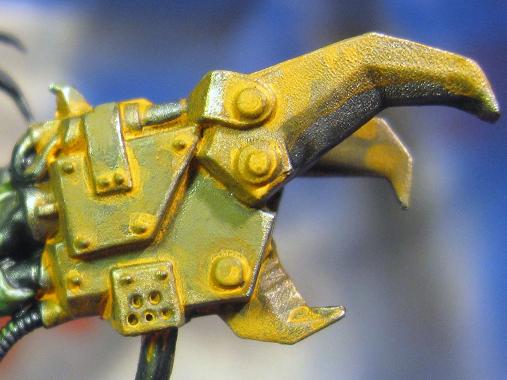
As my jumping off point I get my metallic parts to a single washed shade.  In this case I've painted the power claw with Boltgun Metal.  The green is VMC Brown Violet painted on in splotchy fashion to create a chipped look straight away.  The entire claw was washed with GW Badab Black and the green was then touched up in a few spots with the Brown Violet to add some depth. 


Some people might not have a grasp of using regular paints as a wash but it's really quite simple to do.  You simply need to take your given color and dip your brush in, then using a good amount of water, thin the paint down to a consistency like above.  I usually only dip the tip of my brush in the paint, touch it to my palette and then load my brush with water.  Swirl your brush through the paint until it has an even consistency and load your brush with the mixture. 


The first color washed on is Vermin Brown.  In this example I've actually gone too light and would likely make it heavier still than this.  This layer though acts more as a filter for the areas you are going to build up more with your second color.  Pay special attention to spots unlikely to have much wear and rub, like around bolts and along joins of armor plates in the crevices. 


The second wash is made of Fiery Orange in this example, but should you not have it on hand, any light orange would do just fine.  Again paying special attention to areas not likely to be worn down too much or those that would gather a fair amount of moisture, I applied the wash heavily and after the initial pass was down, I went back to some areas and stippled more of the wash mixture in.


To finish the effect, I've gone back in with Boltgun Metal along a few edges and touched up the Brown Violet again.  The added detailing of the star was painted freehand and will likely still get a few scratch marks painted in with Brown Violet. 

In the end, the effect is far more natural and more controllable.  It's also more conducive to batch painting that I'll be using to finish off Pattun's Boyz!  Now, to finish off the rest of the model...

20100619

Video: Painting Angels Encarmine


Today we're feeding the weekend tips need with a video from LBursley on painting Angels Encarmine Space Marines.  Don't forget you can full screen these and watch them in HD!  It's worth it to see all the little stuff better, namely angle and brush techniques!  Also feel free to leave Les comments here or on his YouTube page


Expect more video work along with the written stuff here on TPC as realgenius and I work to get settled in with video tips as well.  My own work will be more a supplement to the written articles, so stay tuned!

20100613

Video: Painting Space Wolves 13th Company


We've been pushing the community more and more on the airbrush issue.  They just speed things up incredibly and really give fantastic effects.  It's not a complete brush substitute, but the things you can accomplish at a much faster clip make it a near invaluable tool for any hobbyist.  Give this video from LBursley a watch and see a few of the applications first hand.

20100611

Friday Quick Tip: Space Hulk Basing


There was a plan devised in my skull when I first got my toes wet in the game of Space Hulk so many months ago at BoLSCon.  I was for sure going to see what I could do to get these amazing models out and on the gaming table for a game of 40k.  I didn't want to make it so I couldn't use the pieces in their parent game though, so I had to do some work to make that a reality.  After a lot of delay, I've finally gotten around to working on the models, and in today's tip, I'll go over how I went about basing my Space Hulk Terminators