Showing posts with label Basing. Show all posts

20231006

Friday Quick Tip: Easy Deck Plating


Coming back to the hobby after what feels like a solid decade away was daunting. I just wanted to jump back in and get going. I had a plan of what I'd start with and it would change every couple of days. I eventually got stuck in with a Raven Guard Intercessor Kill Team that I would expand into boarding actions as a full fledged 40k army. In selecting that, I also needed to sort out just how I would build out the bases. I'd done a rusty space hulk basing before and wanted something that would simplify that down a little further. A little plasticard and some glue later, I think I've come across a basing style that is as simple as it is effective. 

20110815

Review: SWM Flight Deck Bases


After a weekend gaming with friends, I arrived home Saturday night to a package from Secret Weapon Miniatures.  Inside I found a set of beveled edge flight deck bases I had ordered earlier last week.  These bases were released late last year and have been one of the base styles I've had my eye on for some time.  Thanks to misterjustin, I finally have my mitts on them and have taken the liberty of photographing them out of the bag so that others can see what to expect should they pick up a set themselves. 

The set.

60mm Top

60mm bottom

25mm Top

40mm Top

40mm Bottom

There is some flash around a lot of the bases, but it's nothing that a quick shave with a hobby knife can't handle.  The tops of the bases are all immaculate and don't have any bubbles or warping.  The bottoms of all resin bases tend to have some bubbles from the process but none of them ended up around the edges and there was only one larger bubble that I found and that's shown above on the 40mm base. Details are crisp and surprisingly fine.  There are some bases that I was quite impressed by because of how well the textures take while staying so shallow.

I'm really looking forward to putting these to use in the near future.  Right now I'm considering using them to build upon for some fun space hulk style basing for my Angels Sanguine.  But really, these are cool enough to spark an entirely new project if I'm not careful! 

20110722

Friday Quick Tip: Snow Basing (Video)


In continuation of the video series going back through some of the written tips here on TPC, I took some time to film my snow basing method as I was finishing up my Wolf Scouts earlier this week.  It's a quick little tip, and hopefully it gives a touch more insight into how to go about it. 

20110704

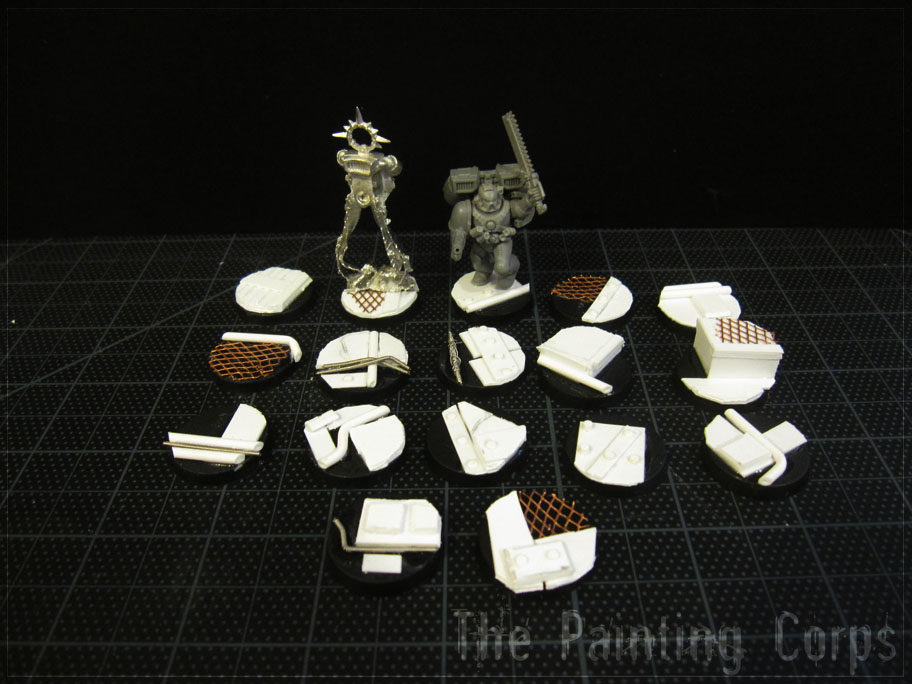
On The Table: Bases Sanguine


I've been mulling over the idea of getting my Angels Sanguine built up into a proper army at long last and have been slowly collecting bits as well as putting the models I plan to use for them to the side.  I've accumulated a good amount of models so far and am planning one last purchase or two that would get them off and running, not to mention fieldable!

For now though, I've taken some time today to crank out a fair amount of bases to save some time down the road.  They're a take off of the work I've already done with my Angels Sanguine Terminator Squad that I made use of the Space Hulk terminators for.  The basing scheme worked well and quickly for them, and works even faster for regular models.  In the end it's a Ork Hulk/Krooza feel and that's something I'm more than happy with!  I've even taken it a few steps further this time creating elevated platforms on two that were built up making small box shapes out of plasticard.  All around it's a variety of plasticard thicknesses, tubing, guitar wire and Contour Mesh for texture.  Rivets were also added that I made using a punch.  I did consider using my tiny rivets, but ended up liking the chunky feel to the big ones.

I'm not certain when this army will see full out build and paint sessions yet, but this was actually a nice breather and allowed me to just play around with ideas while sticking to the theme.  It also let me knock out what could have been a speed bump from unit to unit in a part of a morning!  Getting 17 bases done, including one that fits the slot for my Sanguinor ( Thanks Santa Cruz Warhammer! ).

A single Death Company box should get this army going nicely, and with the bits I've already picked up from the box from Battleroad Games' Ebay shop, I'll have enough cool stuff to help deck out my Assault Squads as well! 


With so many bases it's going to be hard not to start modeling the assault squads right away!  Anyone seen any cool basing ideas around the web lately?

20110506

Friday Quick Tip: Full Water Bases


One suggestion for my Fire Hawk army was a deep blue color to contrast the predominance of yellow and orange.  Immediately I thought of water basing.  I've wanted to experiment with clear casting resin for a while and I finally broke down decided now was the time to give it a try.

20100611

Friday Quick Tip: Space Hulk Basing


There was a plan devised in my skull when I first got my toes wet in the game of Space Hulk so many months ago at BoLSCon.  I was for sure going to see what I could do to get these amazing models out and on the gaming table for a game of 40k.  I didn't want to make it so I couldn't use the pieces in their parent game though, so I had to do some work to make that a reality.  After a lot of delay, I've finally gotten around to working on the models, and in today's tip, I'll go over how I went about basing my Space Hulk Terminators

20100604

Friday Quick Tip: Weathering Pigment Bases


Here's another quick tip I picked up from one of my classes at Adepticon.  I admit, at first I was not that excited with the results when Mathieu Fontaine showed this technique for using weathering pigments for basing in his Weathering class.  But once I got home and was able to try it for myself, I found I really liked it.  I think the long drying time for the pigment fixer makes it difficult to fully appreciate in a short class time.  Anyway, here's my first experiment using weathering pigments for basing.

Here are the tools you'll need for the job: one brush for the pigment, one brush for the fixer, Mig Pigment Fixer and some pigments.  I'm using the APJ Weathering Pigments Les sent to me to check out.  (Note these are the older-style APJ containers, check out the new ones in the APJ Store.)  For this quick rust look I'm using Rust 1 and Rust 3 pigments.


First start with a primed base.  I've got a model on this one, but you can just as easily start with a blank base.  (Or make up a whole bunch of bases for the next time you need to create a squad.)  With this base I wanted the contrast of a granite rock, so I dry-brushed a piece of slate I'd glued down before coating the base with fine masonry sand.


Pick up some of the pigments on your brush and tap the brush on the rim to remove the excess.  It is easy to put more pigment on if you need it, but harder to remove.  And I'm clumsy, so if I load up too much I'm bound to get it all over my desk, making a mess.


Give the base a good coat.  Since this is the foundation layer, make it a little heavier and a little more even.  I'll layer more pigment on top later for some variety.


Once you get the pigments down it is time for the pigment fixer.  Dip your other brush in the fixer and then just touch the brush to the side of the base, letting the capillary action of the fixer soak into the base pigments.  You'll probably have to work around the base, touching the brush in multiple places, to make sure it is completely wet.


Here's what it looks like wet.  Don't worry, it will dry lighter and matte.


Once the first layer is dry (maybe a half to an hour or more, depending on how much you used and the humidity), lay down a second color of pigment in some areas of the base.  In this case I'm using the Rust 1 as a highlight.  APJ and other pigment makes often have several colors of rust, so you can go for more depth by using more layers than just the two I'm using here.


There you have it.  I'm no geologist, so I'm not sure what sort of rusty lava flow over granite boulders this planet will be, but the base choices were made to complement the red, black and white color scheme of the model.  (On some I'll be picking up the blue hue of the granite in the plasma weapons.)  But use whatever color you like.  Pigments are available in a wide variety of colors from earth to clay to sulfur and even brighter colors; there's enough choice out there for any color of base.


One last note on clean-up: I rinsed the pigment brush out in my painting water, but I used soap and water in the sink to clean up the pigment fixer brush.  It was still pretty supple after basing 20 models, but I'd keep around a dedicated brush for both pigments and pigment fixer just in case.

Have questions? We've got answers! We want to help! If you want to see something covered here on TPC, let us know at ThePaintingCorps@gmail.com or on our Twitter or Facebook page!

20100415

Field Report: Painting Realistic Rock


Misterjustin over at FTW has a fantastic quick tip for using oils to paint rock bases.  This is very similar to the technique that many use to weather tanks and other armor and it works great on rock bases.

Have a tutorial, painting guide or maybe just some quick tips of your own you'd like to share with a larger readership?  Send us a link at ThePaintingCorps@gmail.com and we'll help get your articles out to the community!

20100404

Product Review: Dragonforge Lost Empires Bases


A while back I was the lucky recipient of a set of Dragonforge Designs Lost Empires bases.  Jeff ran a contest on his blog for $50 of product from the Dragonforge shop and the fates were in my corner (for once)!  I had seen the Lost Empires set while digging around their site a few times before, and knew where my winnings would go.

The package arrived in a small flip top box, and I immediately went to cutting the tape to get to the fresh resin inside.  One of the first things I noticed was the coloring, it's not the same resin I've come accustomed to from the likes of Forgeworld.  This resin has a lot more heft to it, it has a more solid feel, and even seems to have some plastic like qualities.  It's hard to explain, but I really like the material and wouldn't mind seeing more companies using it.


The amount of flash and clean up was almost negligible.  You can see in the photo above a good indicator of what most of the bases looked like right out of the baggies.  I just ran a sculpting tool along the edge and was finished!  You'll notice that there isn't any pitting or miscast details on the base, with a fantastic level of detail, just look at the surface of each hex for an indicator of the quality of each cast!

I really enjoy all of the variety of the bases, with 10 different 25mm bases, it's easy to mix things up a bit and should you need additional variety, a little fine sand will easily do the trick on the less elaborate bases.  The larger pieces have a few really special details, like the statue heads and large yin-yang flooring.  This is one of the few sets out there that walks the line between exceptional detail and functionality.  A lot of good flat surfaces for mounting models, with creative and well executed detailing.


The biggest tell for quality when you're talking bases is always the bottom, and as you can see in the above, Dragonforge passes with flying colors in this area.  The bottoms of the bases are good and level, no worries about off balance figures from a leaning base.  They are also relatively free of pitting, only two small pits in even the largest base I picked up.  This sort of pride in their product is evident from first glance to finished base, and really speaks volumes for the sort of pieces they are trying to produce from even a small home grown effort.

Overall, if they've got a set you've been eying for that next project, I say pull the trigger and pick them up.  You won't be disappointed, and will have saved a few hours sculpting, carving and detailing the bases yourself.  Just be sure you pin those metal models down!


I hope this small look at this wonderful set helped those of you looking to make a purchase in the future.  I'll definitely be looking to do some additional reviews of this nature in the future.  If you have any experience with Dragonforge products, we'd like to hear about it!

20100318

Field Report: Desert Themed Terrain/Base


Massive Voodoo has another great step by step posted by Raffa. This time on how he's created a fantastic desert themed base. Most of these would be great details for your terrain boards as well. Check it out here!

Have you posted an article to your own site recently? Read something amazing you think others should check out? Have an old link in your Bookmarks that you've been saving for a rainy day? We want to see em! Send your suggestions to ThePaintingCorps@gmail.com and we'll get the word out!

20100314

Field Report: Sculpey Base


Did some surfing the other day and found a fantastic sculpting blog called LUDstuff. The first post I came across was this wonderful basing WIP. You really need to see what this guy is doing.

Have you posted an article to your own site recently? Read something amazing you think others should check out? Have an old link in your Bookmarks that you've been saving for a rainy day? We want to see em! Send your suggestions to ThePaintingCorps@gmail.com and we'll get the word out!

20100313

Field Report: Apoxie-Sculpt for Bases


I haven't seen this stuff before, or maybe I just wasn't looking hard enough. Any way around it, I need to check out a pot of this stuff. Looks like a great addition to my arsenal. Check it out the quick thoughts from MBG on BoLS here.

Have you posted an article to your own site recently? Read something amazing you think others should check out? Have an old link in your Bookmarks that you've been saving for a rainy day? We want to see em! Send your suggestions to ThePaintingCorps@gmail.com and we'll get the word out!

20100223

Field Report: ForgeWorld Weathering Powders


Lost In The Warp has a great review of the ForgeWorld Weathering Powders and compares them to the Mig and Stardust brands. As a bonus there are also a few tips on how to use the powders for rusting a tank and applying a great wet mud look to some Orks. Head on over to Lost In The Warp and check it out.

Got a great link you'd like to see put up? An article you've posted on your own blog? Send it to us at ThePaintingCorps@gmail.com. Just be sure it has something a bit more useful than a pretty picture! It's all about learning folks!

20100219

Friday Quick Tip: Resin Basing Metal Models


After acquiring a set of resin bases from Dragonforge Design recently, I've decided that my Eldar force I've been planning for some time would see the light of day and get the full resin treatment. Little did I know how much a pain it would be to make sure the mostly metal models I have on hand were well secured to their base.


To start off, you're going to need to remove that tab. Just clipping it off isn't going to cut it either. Break out the hobby knife and files and make sure the bottom of the foot is good and flat. Some models are a bit more of a pain than others in this regard. You'll notice that some models use 'pins' of their own to secure them to the tab, that's going to have to go as well!


Once you have the feet flattened down, start to get an idea of where your model will end up. Try a few different options and you might have to be a bit creative to get the pose you are looking for and you might even need to try different bases. Notice the base I'm using in the photo above? It's completely different from the one I stated off wanting to use! Options are a good thing to have when basing metal models.


If you don't have a pin vice at this point, you need one. You'll use it over and over again throughout your modeling career. Drill out a spot on the base and a spot in the foot of your model. Some models have smaller feet and your pin size and bit size will dictate where you're able to pin the model.


Placement of the pin is actually a bit more work than I expected. I found myself placing the pin, in this case a paper clip, and clipping it down multiple times before the model stood flush with the base. If you really want a secure join, a bit of green stuff could do the trick in the base and the foot of the model. I had to use green stuff with a squad of Howling Banshees in fact, as they're far too front heavy and all on one foot.


Don't forget to score the models feet and maybe the contact points on the base before gluing. A quick drop of glue in the pin holes and on the feet of the model should do. Hold firm for a little while and let dry! Once dry, you should have a well secured model that won't give you much hassle down the road.

This tip is mostly about pinning as you can see, but a few considerations need to be taken as you base your metal models. Pin size, bit size, balance and green stuff will all be important to account for! For those of you who are new to pinning, hopefully this gives you a bit of insight into its many uses!

20100201

Field Report: Cobblestone Basing


Gentleben has a great way to go about basing your Warmachine minis over on BoLS. Haven't we gone over the beauty of foam in the past? Check out this great, and simple, tutorial if you haven't already seen it!

20090731

Friday Quick Tip: Spackle Basing


After aquiring an APE Grunt mini from Iorek over on Dakka, I couldn't wait to get started on it. I have been following Incursion for some time now, and I'm really excited to actually own a piece from such a cool game. Hopefully the first of a full set yet to come! Once I ripped open the package and pulled all of the parts out, I realized that the basing was of the 'fill in' variety, similar to Battletech bases. I had just recently posted my spackle terrain tips and immediately thought to make use of the filler for basing for the first time.


To start me off, I just globbed a good amount of filler onto/into the base. I am never really worried about 'over doing it' at this stage as spackle is pretty simple to clean up! Just get the stuff on the base!


To clean up your mess, just use a finger around the rim of the base. Any spots that might give you issue, just use a wet rag and they'll come right up. It's not a huge issue if it's on the base, as you'll likely paint it over anyways, but too much can leave a gnarly texture with no context!


When the spackle starts to hint that it's drying (in this case the white ring), you can start to shape it with a sculpting tool in the styling of your choice. In my case, I went with a concrete paved base. Since Incursion takes place in an underground bunker at Gibralter, it made sense! The lines and carving should go easy at this point, but make sure not to press too hard in any direction, as it'll push the spackle back into the detailing you just made! Once you've got your rough details on, let it dry completely. Any additional details can be carved out of the spackle (carefully!) once dry. It is slightly brittle though, so a steady hand and pressure will be vital in not ruining what you've already created.


As I said above, this stuff is brittle. It needs some sort of sealer. I decided that PVA Glue would be my best bet, so I took some watered down glue and painted it over the entire base surface. And since I was adding glue, I went ahead and added a bit of fine sand to add a bit more texture. If you've been reading all of my basing articles, you might start to see a bit of a pattern here!


And here we have the finished base, ready for its model. I kept my edges rough on purpose and it gave me a great worn concrete look. But it's up to you, the creator, to make your base in your minds eye a reality.


One consideration you need to take into account when using this method of basing though, is the weight of the model! The APE Grunt is a heavy chunk of metal! And like I said earlier, spackle can be brittle, and I just don't trust it to hold such a big hunk of mini to itself without cracking out, even with the PVA Glue wash. So pinning a heavy metal model to the base is probably a good idea.

How well this would work on a model that doesn't have a recessed base like this is all up to how thick you are willing to go with your base. I personally don't know that I would use it on a flat GW style base. But don't let that stop you.

So there you have it, another basing type to put into your repitoire of basing tricks! Any new ideas for basing out there?