20090429

Strathmore Paper Palette

After using a folded up document protector for about 6 months, featured in the Portable Paint Set Tip, I started looking around for other options that were indeed MADE for painting! This lead me to scouring my wife's college bookstore for the art supplies section. At first I looked at getting my hands on some oil paints, maybe some new brushes. But then I happened upon this unassuming product. A simple exterior, mundane and unassuming. Just sitting there next to the sketchbooks and canvas. On a whim, I picked it up, and decided these would get a chance as a member of my paint kit.


After using these for a while, I've come to really love them. They aren't for making your paints last a long time, as the paint is obviously open to drying on the flat surface. But on the go, you have a nice water resistant, opaque, disposable palette on hand that you can fold up and fit in next to no space. It is paper thin after all!


If you're in the market for a cheap mobile alternative to your hard plastic palettes, I highly recommend you give these a try! I haven't gone back to my document protectors since!

20090424

Friday Quick Tip: Shaper Glow

This week's Quick Tip is about using your shaper to get a blended gradient over a rough surface in a short time. The technique is similar to drybrushing, but the shaper has the advantage of not destroying the brush, being a little more precise and not giving a powdery look. I used this technique on the base of my Fuegan model for the glow coming from a freshly Fire Axe cut Black Templar banner. Since then I've worked with the technique more and here are some important tips for getting the best results.

First, I recommend using the Foundation paints. You'll want a paint that is a little thicker and still covers well when spread and I've found that the Citadel Colour and other thinner paints that work well for normal blending just don't hold up to the physical manipulation over a rough surface.

Second, like any painting technique, finding the proper consistency is key. For this technique I work with the Foundation paints a little thicker than I normally do. I always wet my brush before touching paint but in this case I use my fingers to squeegee most of the water out of the bristles before picking up some paint.

Third is to practice. The technique described is similar to drybrushing or overbrushing, but because the shaper is new to me it takes a while to get a good feel for how it picks up paint and moves it around.

The best part about this technique is that it is really fast. You'll have to excuse the over the shoulder angle of these pictures because if you keep the paint on too long it will dry out and not move when you hit it with the shaper. I used a #0 Cup Chisel shaper in these pictures and Mechrite Red, Macharius Solar Orange and Iyanden Darksun as the colors. The base is a GW plastic flying base with a mixture of sand and small rocks and the whole thing (front and back) has been primed black and left to dry completely.


Start by laying down a fairly thick stripe of red. You won't want it to flow into the cracks, so if the paint won't stay on top of your texture you've got it too thin. Put the brush down right away and grab your shaper. I start by pulling across the stripe of paint for about 1 cm to create the "field". After the initial pull is done, I work in shorter quick strokes to fill in the first half of the field and help define the shape.


Next lay down your next color behind the first stripe and repeat the technique, shortening the field for each color.


The final color goes down just like the others. Remember to work quickly once you put the paint down as the shaper spreads the paint and makes it dry faster.


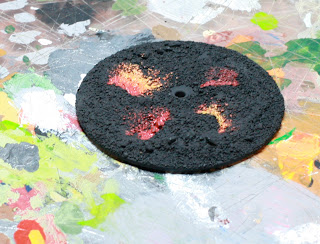
Different types of gradient are easy to make by varying the shape of the initial stripe and how you layer the consecutive colors. In the rounded gradient on the right I made each consecutive color strip shorter than the last. The large gradient on the left was made by laying down all three striped and once and working from the red stripe back towards the yellow: spread the red first, then grab the orange and pull it across the red and finally pull the yellow across the other two. The red in the upper right corner was applied too thin and didn't leave enough paint on top of the texture to pull with the shaper.


Like I said this technique really works best when you do it quickly. You only have a short time to move the paint with the shaper but you can finish a base really quickly. I figure that using this technique to create lava bases for an entire army wouldn't take any more time than normal basing. In fact since you are using only paint and it dries quickly once spread, it might even be faster than waiting for the glue on static grass to dry.

What new tips have your experiments with the shaper yielded?

20090417

Friday Quick Tip: Easy Clean Up

Here's a really quick tip for this Friday; one that will help you clean up faster and gain more time for painting. I love the cheap, white plastic palettes that are available in different sizes and configurations from just about every hobby store around. Being white they provide good color representation, have plenty of places to store mixed colors for blending, cost next to nothing and have a nice center space I use either for bits during model assembly or paint garbage like clumps from old paint or basing rocks that were brushed off.

The one thing I don't love about them is cleaning up. Normally I'd spend a few minutes at the sink, with the palette under running water peeling the little colors off, or scraping them with my thumbnail. With Earth Day next Wednesday, I was inspired to find a way to clean it that didn't use a bunch of water running down the drain.

The solution is gloss medium. When I built my Black Templar army, I purchased a bottle of Liquitex Gloss Medium
for the wet mud "look". After basing about 60 models and painting a whole display board I've got more than three-quarters left of the 8 ounce bottle. I'm never going to use this much gloss, but it turns out the medium is an excellent and easy way to remove paint from those white plastic palettes.

Once all the paint is dry on the palette, just glob on a thick coat of medium and let it dry completely. (Sometimes really dirty palettes require two coats.) Once dry, it is easy to grab an edge and peel the medium off and, when you do, the existing paint on the palette is magically removed.


After a little peeling, you'll have a big glob of acrylic paint and a palette that looks brand new!


I usually use a clean cloth to wipe off any flecks I've missed and it is good to go. This doesn't work well if you have a lot of dried gouache on your palette and white glue will also be a problem, but if you have kids you might even be able to get them to do all the dirty work. My 4 year-old loves to help by peeling the paint all off; maybe I should show him how to paint on the gloss medium on and save myself some time.

What tips do you have for clean up or other those other non-hobby tasks that just need to be done to keep the painting machine running smoothly?

20090410

Friday Quick Tip: Sepia Gold

Chaplain, Space Marines, Terminator Armor, Ultramarines, Warhammer 40,000

Today's tip comes off the heels of a great thread over on DakkaDakka by corpsesarefun showing the effects of the various GW washes on metallics. This is a method I've been taking serious advantage of on lots of different projects since the washes were released. One wash in particular has caught my fancy, Gryphonne Sepia. My initial tests with the wash was as an easy way to shade a white primer into a bone color. From there I began to wonder how it could change metallic paints for me while I was working on my entry for the the Old School Dakka Painting Challenge. I was already using Badab Black in a similar fashion from a technique I picked up from White Dwarf on the model and decided to try it out as an alternative to using gold paint. And thankfully, it panned out better than I could have expected!

I've gotten many questions on how I paint gold recently since finishing my latest entry for a local painting contest here in Texas. And after seeing the simple yet effective results pan out for a close friend of mine from Pennsylvania, I decided it high time to get around to sharing it with the community!


To start out, I normally work from a black basecoat when I'm painting metallic pieces/parts. You can either have started out from a black spray coat or paint black over the parts to be metallic.


And on building from what we've learned from Gentleben a while back I've gone with a Bestial Brown to start us off. This coat is very loose, don't worry too much about coverage, just a quick single coat to get you off the ground and running should be good.


For the purposes of this tutorial I've gone with Chainmail for the metallic paint. I've also applied this in a loose wetbrush fashion. Be a little more careful to cover over large flat areas a bit more thoroughly and leave the bestial brown showing through in the crevices. You can already see the depth of the metals at this stage. From here is where the magic begins.


It's finally time to break out my new miracle paint: Gryphonne Sepia. I normally start the wash off a bit lighter, just enough to cover the surfaces and get a bit into the crevices. Starting lighter gives you more control over the process from start to finish.


Your second layer is really where you start to pull everything together. Again coating over the entirety of the area, you get a stronger color with a nice natural shading to it. Be sure you're allowing the wash to dry in between layers!


Our final picture shows the dried efforts of our second wash. From this point you can go many different directions. Adding another wash over the entire area to darken the metal even further. Maybe just a bit of selective washing to darken certain areas. I've used Shining Gold several times at this stage to 'clean up' some areas, then hitting the gold with Gryphonne Sepia again to tie it all together more. You can also use the base metal color to highlight the metals. Be sure you check out the examples suplied that have used this technique on for more ideas.

Has anyone seen any good use of the other colored washes on any projects around the web?

20090403

Friday Quick Tip: Salt & Hairspray Weathering

Back to weathering we go with today's tip! And this one is probably one of my new favorites. It just involves a little bit of planning and the right project.

The method I've used is a VERY simplified version of the technique. With my lack of an airbrush, and using only what I had on hand, this is merely an introduction. I hope to get a much more elaborate tutorial up in the future, but for now, revel in the simplicity of this amazing technique and I hope to see you apply it on your future projects!

What You Will Need:
Salt, Undercoat Color, Basecoat Color, Hairspray, Toothbrush

For the purposes of this tutorial I've used spraypaints that I had on hand around the house. You'll want an undercoat color that will be able to easily represent rust. I've used a dark brown I've had for about 6 years and somehow it hasn't dried up on me! For my basecoat color I've used a Dark Grey, again something I've had for many years. You'll want your basecoat color to be the base color of your army/tanks. I have also commendered my wifes Hairspray! The salt is just normal table salt from the pantry. Snag an old gnarly toothbrush as well, you know you have one hidden away somewhere!


To get you started, spray the entirety of the model in your Rust Brown. Let it dry thoroughly before moving on. I harp on this a lot because people tend to get impatient with sprays before they are ready for handling. I even had trouble keeping to my own rules during this process! The paint should not be tacky to the touch, if it is, leave it be a little longer and consult your spray can for drying times. As usual, all spray painting should be done in a well ventilated area!


Once your undercoat has dried, it's time to use your hairspray. Coat the model in a layer of hairspray and have your salt on hand to move quickly to the next step.


Scatter your salt by hand over the model, paying closer attention to getting the salt over the areas that would normally catch more wear and tear (corners, hatches, etc.). You want to do this quickly so that the hairspray catches hold of the salt and dries it in place. Once again, let this dry before moving on.


Spray the model in your basecoat color and let it dry. Once it's dry, it's time to break out the toothbrush and start brushing off the salt. Start off lightly and gradually work up the amount of pressure. Once all off the salt has been brushed away, you can pay a little more attention to rubbing away some of the basecoat color along the edges or particular damage spots you want more wear on than others.


In the end you should have results similar to the above in no time flat! A little bit of detail work from here (highlights and such) and you're finished! While this tutorial uses spray paints, with use of an airbrush the results look even more fantastic. The thinner layer of base color will look far better in the end. But a little nozzle control can go a long way with spray paints, so give it a go and really expand your bag of weathering tricks!

So, does anyone have a current project in need of some good weathering? We would love to see them! Post your latest weathering attempts and let us all in on your latest tip!